�Ƃ茾�W�@�ߘa��N�\����
No.8:"�~"�C���@�@���s �@ [ English Note ] �@[2020/10/19]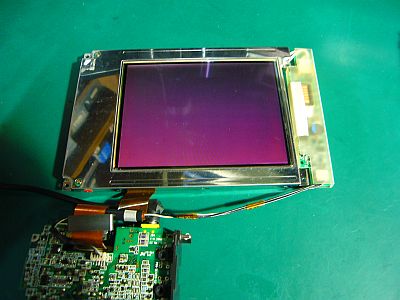
���́uPC110 No.8:"�~"�v�́A�w����������A�d���͓���A�o�b�N���C�g�͎����I�ɓ_�ł��J��Ԃ��A�i�unFSTN-LCD�v�ւ́j"�J�[�\���\��"�͏o�邪�A"����"�͂���ȏ�ɂ͐i�܂Ȃ���Ԃ������B
�|�g����t����ƁA"�O���\��"�ւ̐�ւ��͏o���āA��͂�A"�J�[�\���\��"��"�\���̓_��"���������B�i�}�P�j
���͂����A"�������T�C�Y�\��"�͏o�Ȃ��Ȃ��Ă���B
���߂Ă��邾���ł́A�����i�܂Ȃ��̂ŁA�v�����ĕ������C�������݂��B
�����́A�d�����̗��^�����̂����A�ʂ́u�d�����j�b�g�v�ƌ������Ă݂Ă��A�Ǐ�͕ς�炸�B
�܂��A�d���[�q�̓d���ɂ́A����قǂ̒ቺ�Ȃǂ͌���ꂸ�B
����炩��A�����ł͂Ȃ��ƌ��ߕt�����B
"�\���_��"���C�ɂȂ����̂ŁA���̌�����ǂ��|���Ă݂��B
�d���R�l�N�^�[�q#40�ŁA"�_��"�ɓ���������{2.5V/0V�̕ω�������ꂽ�B
���̒[�q�̘A����������A�uRICHO RB5C396�v�̖T�̒�R�̕Б��Ɍq�����Ă��邱�Ƃ܂ł͕��������B�i�}�Q�m�N���b�N�n�j
�������A��������悪�A�����炸�B
�{�{�{�@�M�����u�����s�@�{�{�{
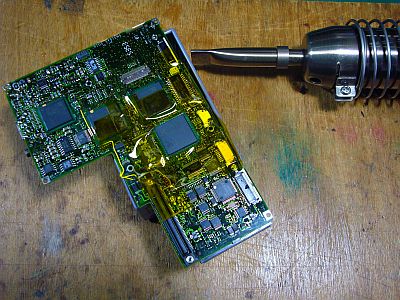
�������Ȃ���A����ȏ�͉����]�߂Ȃ��̂ŁA�i��x���������������͖����ɂ��S��炸�j������������{�[�����c�̊O�ꂪ���邩������Ȃ��ƁA�uRB5C396�v��200�x�߂��܂ʼn��M���Ă݂邱�Ƃɂ����B�i�}�R�j
���ɁA�i�E���\���~�o���āA"��"���悤�ȁA�j�M�����u�����B
�D�D�D���ʂ��O��I�D�D�D�����q���Ȃ����Ă��܂����B�i�\���̓_�ł������Ȃ����j
��������́A�c�O�Ȃ���A�����̖]�݂͖����������B
��́A"���i����"�Ƃ��Ă̖�ڂ����c���Ă��Ȃ��B
���������܂܂ł̕ۑ��́A�ꏊ�����i��Ԃ𑽂���L����j�̂ŁA�ēx�g�ݗ��Ă��B
���̓r���ŁA�L�[�{�[�h�̃t���L�Q���đ�������ۂ́i�ȑO�́j��@���A�Č����Ă݂��B
�t���L�Ɠ������ɐ����Z����̃R�s�[���̏�ɁA�Z���e�[�v�Ńt���L�𗯂߂āA���̒Z��������肻���ƈ����o���A�đ����͊ȒP�ɏo�����B�i�}�S�m�N���b�N�n�j
�i�������A���ꂪ��肭�o���Ă��A�C�����o�����킯�ł��Ȃ��̂ŁA�����������B��j
No.8: "Plum" repair, failed [2020/10/19]
![Fig_1: Blinking and repeating display [Click]��Fig_2 : Connection with power connector terminal # 40](fig/msk1019a.jpg)
This " PC110 No.8:" Ume "" is turned on from the beginning and the backlight blinks periodically. , "Cursor display" (to "nFSTN-LCD") appears, but "operation" does not progress any further.
With the pot, I was able to switch to "external display", and there were also "cursor display" and "blinking display". (Fig_1)
Display of "memory size" is no longer displayed.
Just looking at it doesn't make any progress, so I took the plunge and tried to disassemble and repair it.
At first, I suspected that the power supply unit had deteriorated, but even if I replaced it with another "power supply unit", the symptom did not change.
In addition, the voltage of the power supply terminals did not drop so much.
By such reasons, I decided it wasn't here.
I was worried about "blinking display", so I tried to find the cause.
At power connector terminal #40, a change of about + 2.5V / 0V was observed in synchronization with "blinking".
After investigating the connection destination of the terminal, I found that it was connected to one side of the resistor near " RICHO RB5C396 ". (Fig_2 [click])
However, I couldn't find out any path to other points.
![Fig_3 : I tried heating the RB5C396 [click]��Fig_4 : Work to return the keyboard flex group](fig/msk1019c.jpg)
++++ Gambling and failure ++++
If I don't do anything, I can't expect anything more, so (even though I have never tried it successfully), I decided to heat it to nearly about 200 degrees. (Fig_3)
Because I thought there might have been a ball solder coming off from " RB5C396 ".
It's gambling (like paying a million yen and buying a "lottery ticket").
.. .. .. The result is off ! . ... I lost my principal and interest.
(The blinking of the display has disappeared)
Unfortunately, there seems to be no hope of a resurrection.
After that, only the role as "parts collecting" remains.
Storage in the disassembled state takes up space (occupies a lot of space), so it was reassembled.
Along the way, I tried to reproduce the (previous) method of reattaching the keyboard flex.
I fastened the flex with cellophane tape on a strip-shaped copy paper cut to the same width as the flex, and pulled out the strips together, and it was easy to reattach. (Fig_4 [click])
(But I'm sad because I couldn't do this well or repair it. Bitter smile)
PC110 JP/US���[�h�@�@�m�F �@ [ English Note ] �@[2020/10/11]
�{�{�{�@JP/US���[�h�����Ŏg�p�\�@�{�{�{
Moonlight����̍쐬���ꂽ�uVpatch.c�v���A�uWin95, 98�v�ł�����\�炵���̂ŁA����ɖ��͂������āA���p���Ă݂��B�i���̗l�q�́A��Łj
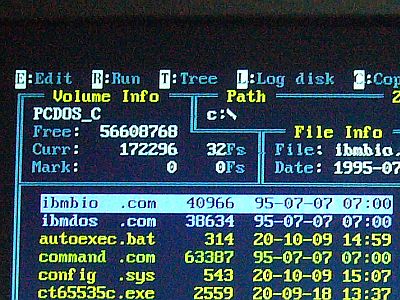
���́A������R���p�C��������̂ɁA�ӎ�������"US���[�h"�ɐ�ւ��Ă����̂����A�ӂƁA�uct65535c, d�v�Ȃǂ́A"���ꃂ�[�h"��ς��Ă����͖����̂��ȁH�ƋC�ɂȂ����B
�����ŁA"WVGA-TFT���"�i�}�P�j��A"VGA23-TFT���"�i�}�Q�m�N���b�N�n�j�Ŋm���߂Ă݂��B
���ʂ́A��]�ʂ�ŁA���ɖ��͖��������B
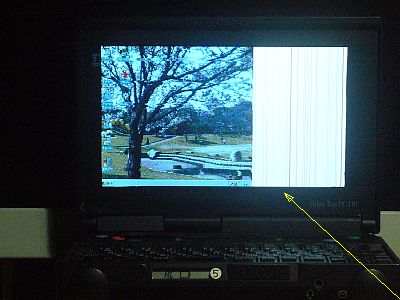
����ł́A"�O���t�B�b�N�\��"���A�y��"Win95,98"���쎞�ɁA��ʂ̉E�����������邱�Ƃ��A�uct65535c, d�v�́i��j���_�Ȃ̂ł���B
������A�蓮��XR���W�X�^�FXR1C�̒l�i�����A4Fh�j���A50h�`70h�ɏ��������邱�Ƃ��o����A���̌������C�o�������Ȃ̂����A�܂��A���͂���"Win-OS�v���O����"�������Ȃ��ł���B
�i����"DOS�v���O����"�ł́A"Win-OS"���t���Ă���Ȃ��̂��B�ǂ����㏑������Ă���炵���j
�����A�����w�͂͂��čs������B
�{�{�{�@�uVPATCH2�v�����������@�{�{�{
�_�E�����[�h�����Ė�����uVPATCH2.c�v���ATC++3.0�ŃR���p�C�����āA���s�t�@�C���uvpatch2.exe�v���uconfig.txt�v�Ƌ��ɁA���[�g�E�f�B���N�g���ɒu���A"Autoexec.bat"�̐擪�s��"vpatch2.exe"�Ə������B
�Ƃ��낪�A�d��������A�J��Ԃ����Z�b�g�����Ԃ��A�~�܂炸�B
���ǁA�uconfig.txt�v�̐擪�ɂ���"0"�́A��ʼn�ʂɏo�ė��鐔���iCRC�H�j�ɏ��������Ă����Ȃ��ƁA���u�[�g��"�J��Ԃ����s"�ɓ����Ă��܂��A��Moonlight���狳����āA�������C�������B�iTNX�I�j
�i���݂ɁA���̃}�V���ŌJ��Ԃ��o�ė���`�F�b�N�E�T���l�́u0x67c�v�ŁA�R�����g�E�A�E�g���Ă���l�u93c6�v�Ƃ͈���Ă���悤���j
�ꉞ�A�uPC-DOS�v�ł��A�uWin95�v�ł��\�����o��悤�ɂ͂Ȃ������A"WVGA-TFT"�ł́A�Ȃ����A���̕\�����ς��B�����������̂ŁA�S�̂��l�p�`�Ɍ�����B�i�}�R�j
���݂ɁADOS�ł̓W�b�^�������A��ʂ̉E���قǗ���āA�������ǂ߂Ȃ��Ȃ�B
����CF���A"VGA23-TFT�}�V��"�̕��Ɉڂ��ē��삳�������A��͂蓯���悤�Ɉُ�\���B�W�b�^�������B�i�}�S�m�N���b�N�n�j
�����A�W��������"XR���W�X�^�̒l"��ς��Ă݂����A�]�v�ɍ����Ȃ����B�D�D�D���R���ǂ�������Ȃ��B
�n�[�h�E�F�A�ׂ̍��ȈႢ�Ȃ̂�������Ȃ��肩�ł͂Ȃ��B
�W�b�^�̕��́AMoonlight����̌����F"DCLK�̎��̈����ɂ�鈫�e��"�Ȃ̂�������Ȃ��B
�ł��A���́A�W�����N�uPC110�v�S���ɁA���̉��Ǒ���n�[�h�E�F�A�Ő������Ƃ́A�o���邾�����������Ǝv���Ă���B
��͂�A�o������̂Ȃ�A�\�t�g�E�F�A��"���オ��"�ɂ�肽�����̂��B
PC110 JP/US mode, confirmation [2020/10/11]
![Fig_1 : WVGA-TFT works in US mode [Click]��Fig_2 : VGA23-TFT also works in US mode OK!](fig/msk1011a.jpg)
+++ Can be used in both JP/US mode +++
Mr. Moonlight created " Vpatch.c " is workble on " Win95,98 , so I was attracted to it and tried it. (See later)
Actually, when I compiled it, I unknowingly switched to " US mode ", but suddenly, " ct65535c, d " etc. Is it okay to change the language mode ? I was worried.
Therefore, I checked it on the "WVGA-TFT screen" (Fig_1) and the "VGA23-TFT screen" (Fig_2 [click]).
The result was as desired and there were no particular problems.
Currently, the right side of the screen is missing when "graphic display" and " Win95, 98 " operation, " ct65535c, d �h(Large) problem.
Again, if I could manually rewrite the value of the XR register: XR1C (probably 4Fh) to 50h-70h, I could fix the gap, but I still have that " Win-OS program "cannot be written.
(In the current "DOS program", " Win-OS " does not accept it. Apparently it has been overwritten.)
However, I'll make an effort to write !
![Fig_3 : WVGA-TFT screen (Win95) with square display by VPATCH [Click]��Fig_4 : VGA23-TFT screen (Win95) by VPATCH](fig/msk1011c.jpg)
+++ I tried "VPATCH2", but +++
I compiled downloaded " VPATCH2.c " with TC++ 3.0 , and I made the executable file " vpatch2.exe ".
I put it in the root directory with " config.txt " and wrote "vpatch2.exe" in the first line of "Autoexec.bat".
However, after turning on the power, the state of repeatedly resetting did not stop.
After all, "0" at the beginning of " config.txt " must be rewritten to the number (CRC) that appears on the screen later, otherwise it will enter "repeated execution" of reboot, Mr. Moonlight taught me and I fixed it. (TNX!)
(By the way, the checksum value that appears repeatedly on my machine is "0x67c", which is different from the commented out value "93c6")
For the time being, both " PC-DOS " and " Win95 " are displayed, but in " WVGA-TFT ", the display is strange for unknown reason. Since the width is narrow, the whole looks like a quadrangle. (Fig_3)
By the way, in DOS , the jitter is severe, and the right side of the screen is disturbed, making the characters unreadable.
I moved the same CF to the " VGA23-TFT machine" and operated it, but the same error was displayed. Jitter is also terrible. (Fig_4 [click])
I tried changing the "XR register value" that seems to be related, but it just got worse. .. .. .. I'm not sure why.
I'm not sure if it's some small differences in hardware.
Jitter may be due to Mr. Moonlight 's view: "The negative effects of poor DCLK quality".
However, I'm thinking to avoid using hardware to improve all junk " PC110 " as much as possible.
After all, if possible, I would like to get good result by low (hardware) cost with (lower) software.
135�x�Ό��@�@���s �@ [ English Note ] �@[2020/10/05]
�{�{�{�@�P�Ȃ钼���Ό��������@�{�{�{
"�r�l�K�[�E�V���h���[��"�ɖ`���ꂽ�uPC110�v���t���\�����iFSTN-LCD�j���~���ɂ́A�u�ʑ����⏞���v�i�܂���200�x����230�x�������Ă���u�ʑ��⏞�t�B�����v�Ȃǁj���K�v�Ȃ̂����A�ȑO�́A��萻����Ђ�̔��㗝�X�o�R�ł�������̌����݂͖����A�܂����B�A�}�`���A������o����p�͖��������B
�������A�t���Z�p��China�Ɉڂ�A�����ƂȂ�Ή��ł�����Ĕ���X��������l�B�Ȃ̂ŁA������������A���̃��[�g�œ���\�ɂȂ��Ă͂��Ȃ����H�ƍl���Ă����B
���́A���ɁA���������u�ʑ����v����肳�ꂽ�炵���b���l�b�g��Ŕq�����āA�����T���Ă݂��B
����́A���̈�ŁA�����������炻�̓����������Ă���\���͖������Ɓu90�x�Ό��v�Ɓu135�x�Ό��v���Ă݂��B�i���Q,�O�W�X�����E�萔�����݁A���R,�S�U�S�����E�萔�����݁@�}�Q�m�N���b�N�n�j
�����A"90�x�Ό���"��"135�x�Ό���"�́A�ǂ�����P�Ȃ�"�����Ό���"�ŁA���������ɑ���"�X���p��\������"�ł����Ȃ��悤�ŁA"�ژ_��"�͎��s�������B
135�x�́A45�x�X���Ēu�����̂ƁA�قړ����Ȃ킯���B
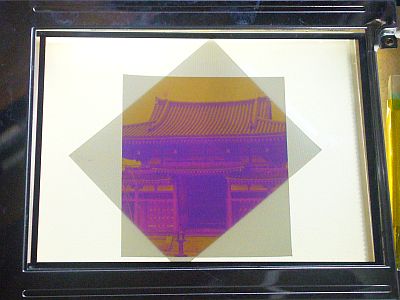
�S�F�̈ʑ��⏞���o���Ă��Ȃ�����A"�R���g���X�g"���o�Ղ��ԐF�t�߂̉摜���ǂ�������B�i�}�P�j
����ȉ摜�ʼn䖝����Ȃ�A�u90�x�Ό��v�̕����A�ǂ�����i�w�ǁj�X�����Ɏg���邩��A�g���Ղ����낤�ȁB�ł��A����ȉ摜�ł́A�ƂĂ������o���Ȃ��B
�u�ʑ����⏞���v�Ƃ͌����Ă��A�s��ɂǂ�Ȗ��̂ŏo�Ă���̂�������Ȃ��B
���̐����Ȓm���ł́A"�����ܐ�"���Ƃ�"�~�Ό�"���Ƃ��̌��t���i���̒��Łj�Q�����Ă͂��邪�A����������r���[�ŁA�m���ł͂Ȃ��B
�Ȃ̂ŁA�蓖���莟��A�����Ŋm���߂Ă݂�ȊO�ɁA��͖����������B
�������A���́A�uPayPal�v���g���Ȃ��̂ŁA�O�����i�̍w�����o���Ȃ��B
���ʁA���ʌ��������邩��A�����Ȃ��̂́A�ǂ����ƂȂ̂�������Ȃ��B�i��j
![�}�R�F���肷�鍂�����i�H�j���א��ɕύX���Ă݂��@�@�m�N���b�N�n���}�S�F�]���̐��Ɠ��ꊷ����0.2mm����](fig/msk1005c.jpg)
�{�{�{�@�o�b�N���C�g�̏����ǁ@�{�{�{
STN�t���́u�Ό��v�����ւ�����A�p�x�߂����Ƃ����Ă���ƁA�u�o�b�N���C�g�v�̎����"���肷���"���A�ז��ɂȂ�B
������A0.2�o�ӂ̐≏�햌�̂���א��ɑւ��Ă݂��B
�����āA�����CCFL�ǂɉ��킹�āA�J�o�[����ʂ�����A�����������肵�Ĉ����Ղ��Ȃ����I�i�}�R�A�}�S�m�N���b�N�n�j
���̕����ňُ킪�o�邩�ǂ��������Ă��邪�A���܂łɂ́A���Ɉُ�͖����������B
�莝���̂��̂́A�S������ɑւ��Ă��������Ǝv���Ă��邪�A�ʂ����āA����炪��������͗���̂��낤���H
135 degree polarizing plate, failure [2020/10/05]
![Fig_1 : 45 (= 180-135) degree tilting polarizing plate�@ [click]��Fig_2 : trimming Polarizing filter group (not enough for PC110)](fig/msk1005a.jpg)
+++ It was just a linear polarizing plate +++
To save the LCD display (FSTN-LCD) of the " PC110 " affected by the "Vinegar Syndrome", " A phase difference compensation plate (or a "phase compensation film" twisted 200 to 230 degrees) is required, but previously, it was only possible through major manufacturers and distributors. First of all, there was no way for us amateurs to get it.
However, after the LCD technology moves to China, the people tend to make anything and sells, so maybe it's available through that route ? I was thinking.
I already saw the story on the net that it seems that such a "phase difference film" was obtained, and I also searched for it.
This time, as part of that, I bought a "90 degree polarizing plate" and a "135 degree polarizing plate" to see if they might have that characteristic. (\ 2,089 shipping and handling included, \ 3,464 shipping and handling included. Fig_2 [click])
However, both seem to be just "straight polarizing plates", "90 degrees" and "135 degrees", and numbers representing "the tilt angle" in the length direction.
Therefore, 135 degrees is almost equivalent to placing it at an angle of 45 degrees (=180-135).
Since the phase of all colors is not compensated, the image near red, which is easy to appear "contrast", looks good. (Fig_1)
When I put up with such an image, it will be easier to use the "90 degree polarizing plate" because both can be used without (almost) tilting. However, I am not very satisfied with such an image.
Even though I say " phase difference compensation plate ", I don't know what the name is on the market.
In my half-hearted knowledge, the words " birefringence " and " circularly polarized light " are swirling (in my head), but eventually Is halfway, and I'm not sure.
So, as soon as I get it, I can't help but check it myself.
However, now that " PayPal " cannot be used, foreign products cannot be purchased.
On the other hand, it may be a good thing not to buy because it reduces waste. (Bitter smile)
![Fig_3 : High-voltage (?) line that makes a big turn ? I changed it to a thin line [Click]��Fig_4 : Replace with the conventional line 0.2mm�� line](fig/msk1005c.jpg)
+++ Small improvement of Backlight +++
When replacing the "polarizing plate" of the STN liquid crystal or adjusting the angle, the "rounding line" around the "backlight" gets in the way.
I replaced it with a insulated thin wire of 0.2 mm��.
Then, when I put it along the CCFL tube and passed it through the cover, it became much cleaner and easier to handle! (Fig_3 and Fig_4 [click])
I'm looking to see if there are any abnormalities with this method, but so far it seems that there are no particular abnormalities.
I'm thinking of replacing everything I have with this, but when these will come to life ?
�V�ዾ�@���� �@ [ English Note ] �@[2020/10/03]
�{�{�{�@�V�ዾ�����[�y�Ɂ@�{�{�{
���g���Ă���u�w�b�h���[�y�v���A�����̗��ߋ����ɂ��Ȃ��ė��Ă���B
���ׁ̈A���ˏグ�Ă��A�����܂����ꉺ�����ė���̂ŁA�����ւ��悤���ƁA�V�����̂��Ă݂��B�i���P,�Q�P�O�������݁@�@�}�Q�m�N���b�N�n�j
�������A����́A����̃����Y�̒��S�����߂��Ă���̂��A��ό���āi���ɂ́j�g���Ȃ��I
�ʓr�A�S�ϓX�ŁA�V�ዾ�ix2.5�j�Ȃ���̂��Ă݂��B�i���P�P�O�ō��݁j
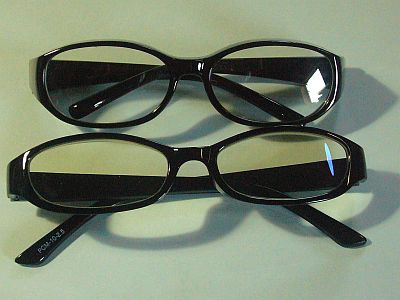
�ȑO�ɁA�ʔ������ŁA���ʋ��ix1�j�����̂����A�������������������Ȃ������̂ŁA����̂��A�S�O�����ɔ������킯���B�i�}�P�j
�g���Ă݂�ƁA�g�債�Ă݂�̂ɁA�Ȃ��Ȃ��g�����肪�ǂ��I
�u�w�b�h���[�y�v�́A�d���āA�������A���������鎞�ɂ́A�����������ˏグ�˂Ȃ�Ȃ����A���̘V�ዾ�́A����������ۂɂ���R���͏��Ȃ��B
�Ⴆ�A0.5mm�s�b�`�̃s���Q�̔��c�t�����ɁA���c�W��u�����������肷��ۂɁA�u�w�b�h���[�y�v�̂悤�ɒ��ˏグ��K�v���������Ȃ��ōςށB
����́A�����͐S���I�Ȃ��̂ł͖������Ǝv�����A�ዾ����"�O���Ȃ����m"�Ƃ����ӎ������邩��A�����ڂ₯�Ă��悤�����܂����A���̂܂ܐU������Č��悤�Ƃ��Ă���炵���B
�Ƃ������ƂŁA�S�σO�b�Y��"�V�ዾ"�́A���ו��i�̔��c�t���ɁA��ϗL�p�ł��邱�Ƃ����������B
x3��������炵���̂ŁA����������āA�����Ă݂悤�Ǝv���B
Buying reading glasses [2020/10/03]
![Fig_1 : 110 yen goods ordinary mirror x1, front is reading glasses x2.5�@ [click]��Fig_2 : Buy separately Temi head loupe](fig/msk1003a.jpg)
+++ Reading glasses as a magnifying glass +++
The clasps on both sides of the "head loupe" I'm using now are getting loose.
Therefore, even if it jumps up, it will hang down again soon, so I bought a new one to buy a new one. (\ 1,210 shipping included, Fig_2 [click])
However, this is very difficult to see (for me), probably because the center of the binocular lens is too close !
Separately, I bought a reading glasses (x2.5) at a 100-yen shop. (\ 110 including tax)
I bought a regular mirror (x1) for fun before, but I didn't feel bad when I put it on, so I bought it again without hesitation. (Fig_1)
When I try it, it's easy to use even when I try to expand it considerably !
The "head loupe" is heavy and must be flipped up each time when looking at a distance, but these reading glasses have little resistance when looking at a distance.
For example, I don't have to feel the need to flip up like a "head loupe" when placing or removing a soldering iron while soldering a 0.5mm pitch pin group.
I think this is half psychological, but with glasses, there is a consciousness that it is something that cannot be removed, so it seems that he is trying to look back as it is, regardless of whether the image is blurred or not.
Therefore, it was found that the 110-yen goods "Reading glasses (for ole man)" are very useful for soldering fine parts.
There seems to be x3, so I'll buy this one and give it a try.