独り言集 令和四年十二月版
IBM PC110s (12,14) 調べ [2022/12/31] [to English Note]
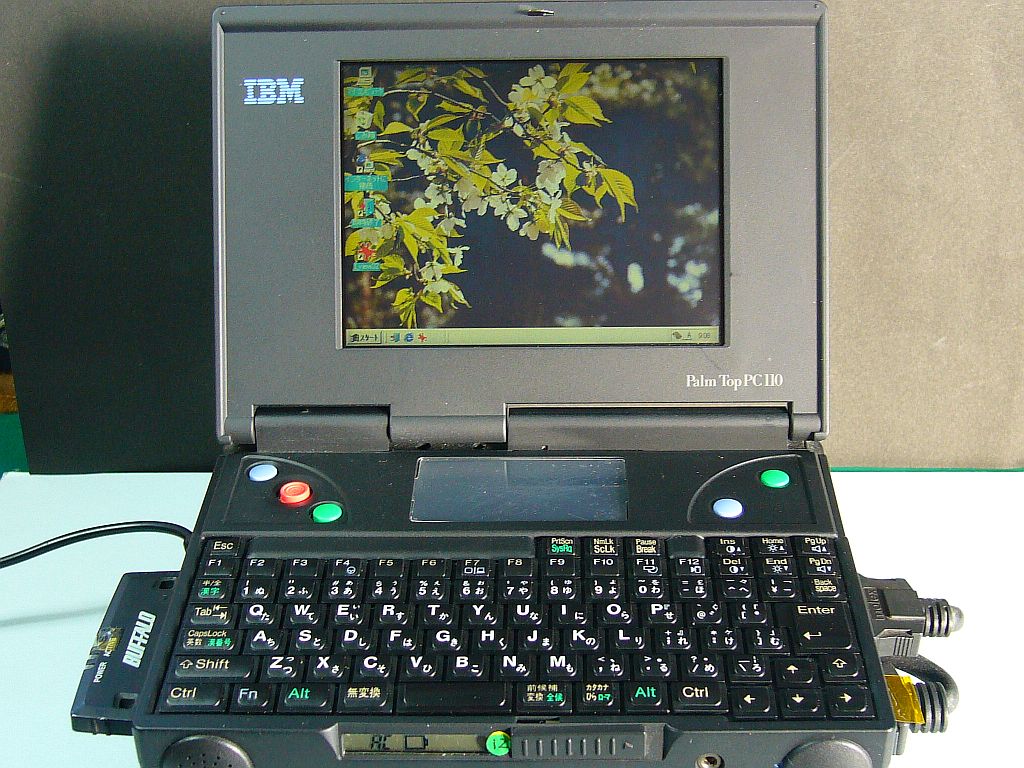
+++ 「No.12:樫(4.7型DSTN-LCD)」 +++
これまでの経過以降、「PC-DOS」、「Win95」「Win98」などで起動すれば、安定に動作している。
「LCD表示」も、元の「DSTN-LCD」のままだが、(明るさは別にして)左程劣化はしていない。
これは、「LCD制御基板」を修理した以外は、敢えてハードウェアは何処も触らず、ほゞ“本来の「PC110」のままだ。(ただし、「ひょうたん電池」は取り除いた)
只、残念ながら、「画面輝度」がかなり低いので、(老近眼の)目を凝らしても、小さい文字が見難い。
また、「サウンド系」が異常で、音は出るものの(意図的に停止させないと止まらない)“モーター・ボーディング音”(参考動画)が出ていて、使えないのが“難”。
妙なことに、「シリアル通信系」を使う「JV-FAX」を走らせても、この“モータ・ボーディング音”が邪魔をして、“受像不能”になっている。
この「サウンド系」は、多分(ドライバ・ソフトなどの問題ではなくて)、“ハードウェア”の異常ではないかと思う。
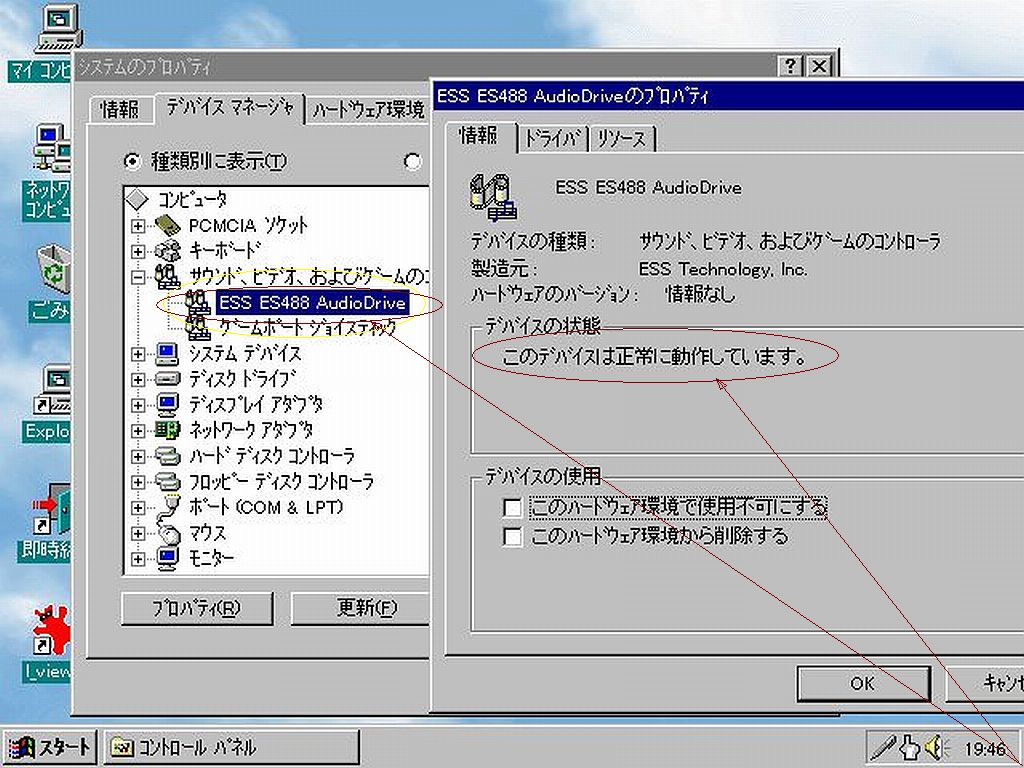
+ 「ESS488」ドライバ +
(これの“モータ・ボーディング音”の発生は、以前からあったのだが、他の雑事にかまけて、殆ど追求して来なかった)
先程から、ドライバを疑って、他の幾つかを試してみたのだが、やはり、適正ドライバは「ESS ES488」らしい。(図15)
これでないと正常に音が出ないが、音が出るようになると、それに重なるように“モータ・ボーディング音”が出て来る。
...それで、これ以上の追求は、一旦中止。
(次の、「No.14:桧」でも、同じ問題が出て来たので、後で併せて考えてみる)
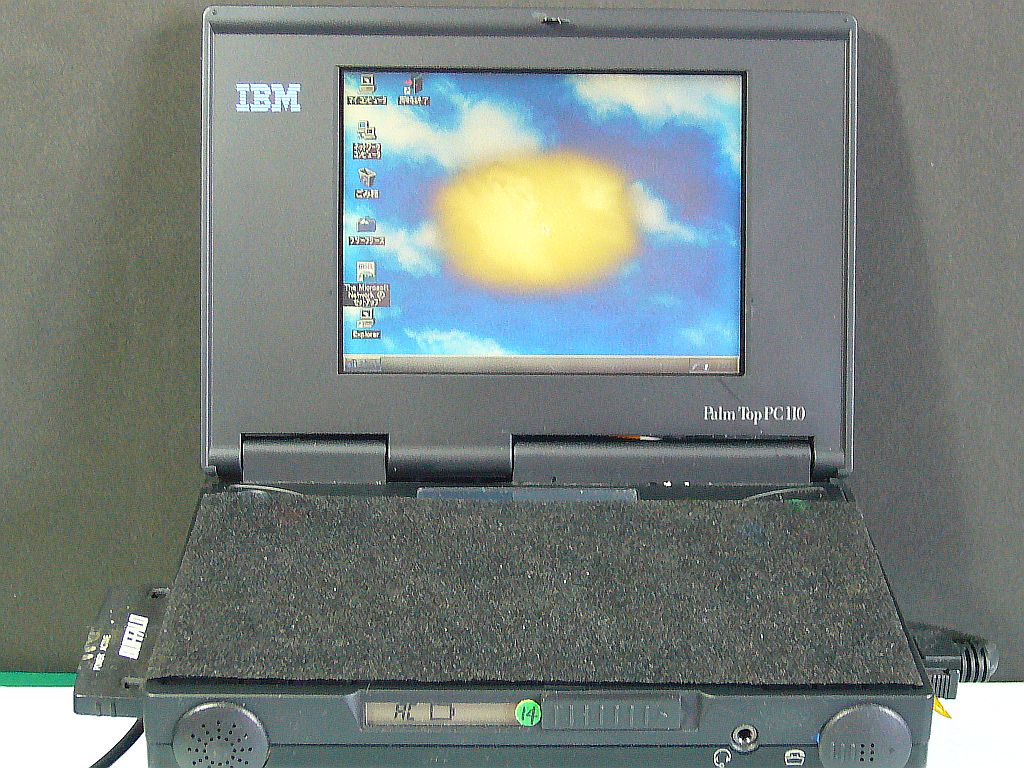
+++ 「No.14:桧(4.7型DSTN-LCD)」 +++
この「No.14:桧」は、一時、表示部に「TFT-LCD」を仮搭載していたのだが、元の「DSTN-LCD」(の「LCD駆動回路基板」)を修理したら、表示可能になったので、表示部を元に戻した。
戻した当時は、“表示部(「DSTN-LCD」)”も、申し分ない程の“綺麗さ”だった。
しかし、その表示部も、例に洩れず、日が経つにつれて、劣化して来た。(図14)
その上、このマシンも「サウンド系」がオカシクなっていた。
以前はその気配も無かったのに、何時の間にか、「No.12:金剛」と同じような“モータ・ボーディング音”が出ている。
このマシンは、「キーボード」を始めとして、外観は至って綺麗なので、このままそっと“動態保存”しておきたかったのだが、どうやら、そうもいかないらしい。
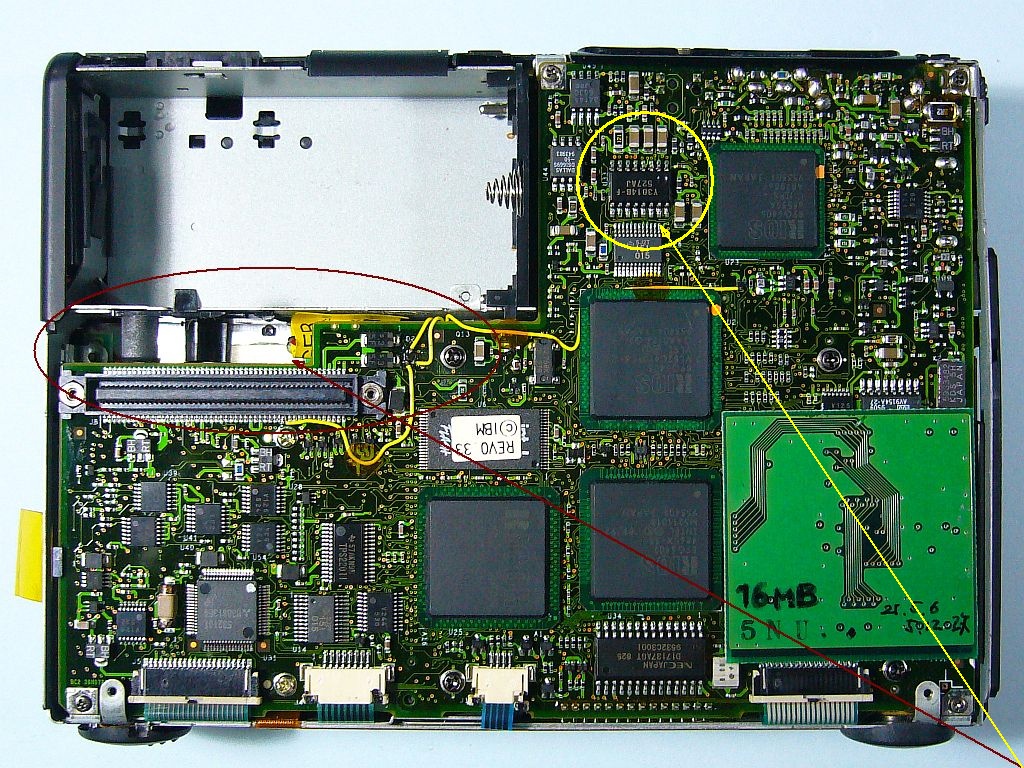
+ 電池液漏れの被害は無し! +
取り敢えず、裏蓋を開けて、例の「ひょうたん電池」の周囲を見た。
その電池は、手元に来てから直ぐに取り外したのだが、その時には、“電池液洩れによる腐食”などは見られなかったし、今も無い。(図15)
もしかしたら、“モータ・ボーディング音”は、「サウンド系IC」の“電源系コンデンサの容量抜け”ではないかと思う。
そこで、昔、拾い出したIC名から、「サウンド系」のICを探してみると、2個程ある。
@黄色9番:Y3014(YAMAHA DAC)
@赤色9番:ES488(ESS Audio driver)
...しかし、ちょっとその辺りを見ただけでは、“不具合箇所”などは分からない。
時間を掛けて、じっくりと調べて見なければ...
IBM PC110s 現状(5,9) 調べ [2022/12/30] [to English Note]
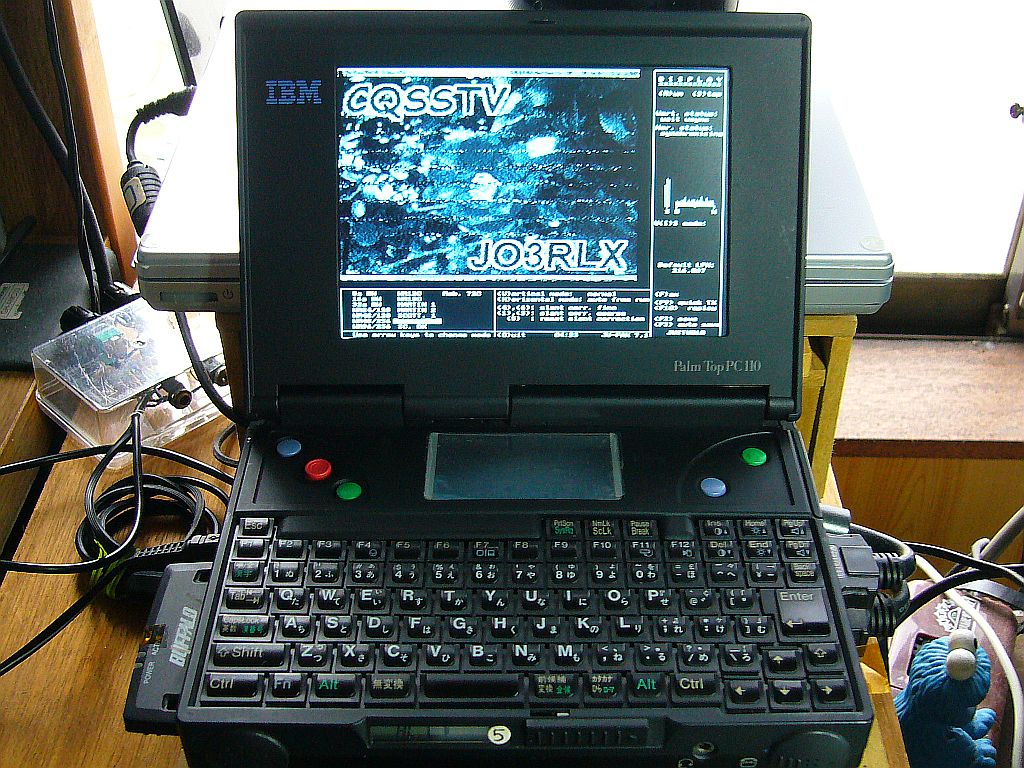
+++ 「No.5:五郎(6型TFT-LCD)」 +++
(“だんだん良く成る/鳴る法華の太鼓”の諺通り、あれこれ試行錯誤している内に?!)この「No.5:五郎」で、「6型WVGA TFT-LCD」の窓枠のレイアウトが、ほゞ満足出来るものになった。(図7)
これは、窓枠の左側を多く削り落としたからだが、“画面右寄せ”をする為に、
ct65535f.exe /m6(DOS用)
ct65535w.exe 11(Win95/98用)
としてある。
尚、"プログラム名"と"オプション"は、(Win95,98版) [ct65535w x」で、必要な右寄せ幅xは、例えば、x=14と10進数で指定する。
このプログラムの実行には、先に「PORT95NT.EXE」(使用・配布は自由)を実行して、「DlPortIO」を組み込んでおかないといけない。
このマシンは、今はもっぱら、(DOSモードで)「JV-FAX 7.1」での“SSTV受像”をさせている。
「インタフェース」(Hamcomm型)は、ネット上の情報を参考に、自作したもの。
「受信機」からの“音響出力”は、“分配器様”のものをプラスチック箱に組み込んで、「シリアル出力」や「オーディオ出力」に振り分けている。(図7内左側)
「JV-FAX」は、クロック33〜40MHzの「PC110」のDOS上で軽々と(?)動くんだが、残念ながら、画面上の画像は、白黒だ。(記録画像は、256色のカラー)
受信状態が良い時には、大変綺麗な“画”が得られるので、一応満足♪
(写真の受画像は、「JO3RLX」さんのものを無断拝借。感謝!)
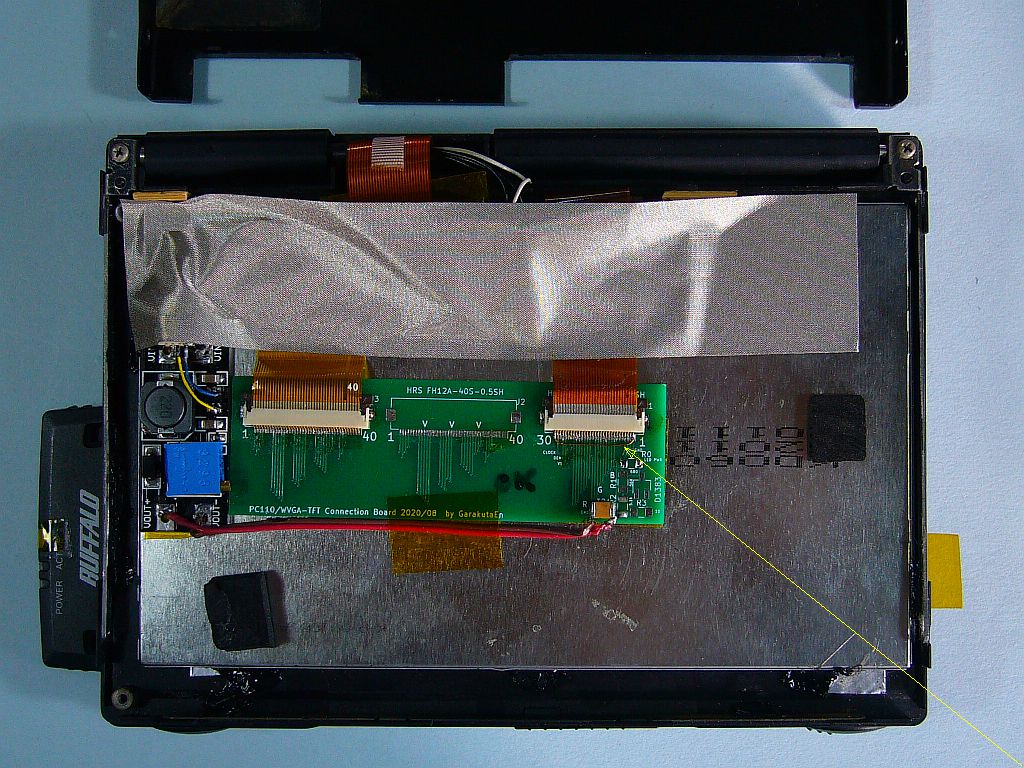
+ 「LCDケース」の中身 +
「No.3:三郎」も同様だったが、この「No.5:五郎」の「中継基板」は、“最終修正”の一つ前の物で、“GNDラインの共通化”が抜けていて、それを(細い)「ジャンパ線」で補ってある物を使っている。(図8)
(最終版のガーバーデータは、一応、作ってはあるのだが、面倒なので“基板試作”まではしていない)
このマシンは、「Win95/98」で働かせていると、時々、画面が“しゃくれる”ことがあった。
対策として、最近「電磁遮蔽用テープ」を入手したので、これを貼ってみた。
今の処、“しゃくれ”は起きていないので、効き目はあるようだ。
尚、「WVGA TFT-LCDモジュール」を固定するのに、黒色の「ホットメルト・ボンド」を使っている。
これは、強いショックを与えると、外れてしまうことがあったので、今でも要注意だ。
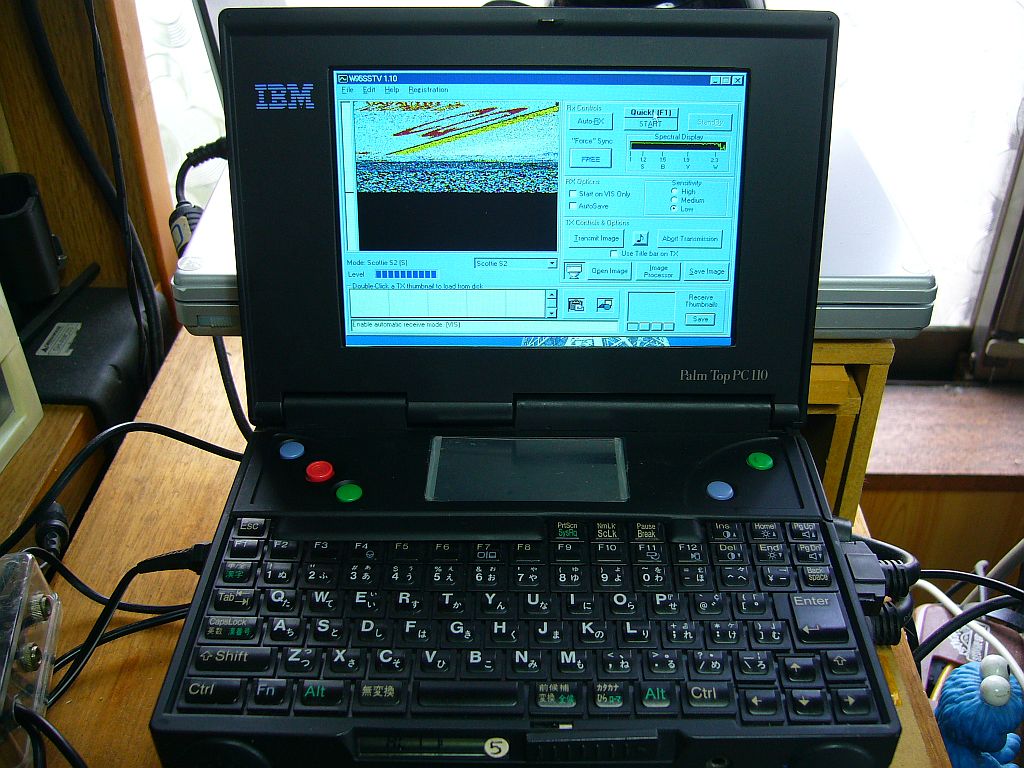
+ SSTVカラー受像の試み +
「JV-FAX」を使えば、白黒画像は得られるが、やはり、どうにかして、カラー画像にしたい!?という願望がある。
試しに「Win98」に「Win95SSTV」を組込んだ「CF」を使って、7.178MHzを受信・受像してみた。(図9)
「主メニュー」などは、ちゃんと出るし、各ボタン押しにも反応がある。
だが、「開始入力信号」の後、“受信画像の描画”にかなり遅延があるようで、およそ1/3〜1/4の範囲で、しかも“傾いた画”でしか出て来ない。
“逓倍周期”と“位相”が合わせられると、多少は“素直な画像”になるのかもしれないが...調節は不可?
多分、画像変換の際の“計算処理”に時間が掛かっているからだろう。(カラー3色分だから、モノクロの3倍なのかな?)
もし、“処理速度”が、3〜4倍(CPUクロック:100MHz〜133MHz)であれば、全画像がもう少し綺麗に描けるだろうと思う。
...まぁ、無いものねだりになるが、CPUが「i486SX」ではなくて、「i486DX」だったら、可能ではないのかなぁ。
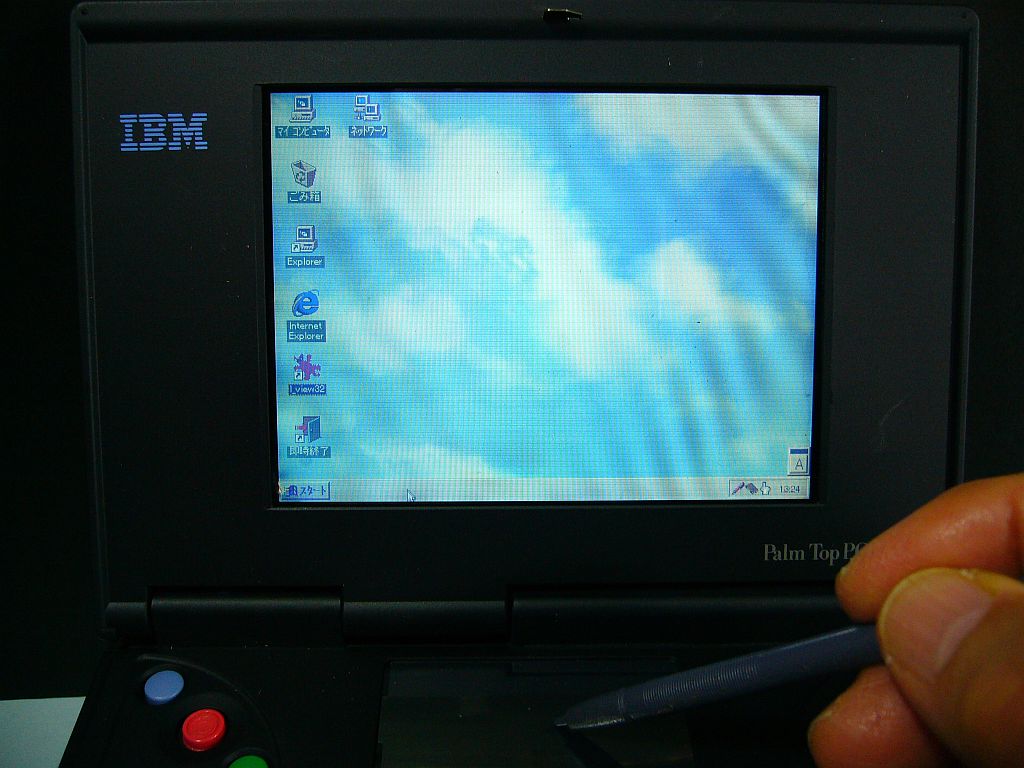
+++ 「No.9:金剛(4.7型改FSTN-LCD)」 +++
「No.9:金剛」は、劣化した“偏光フィルム類”を張り替えて、出来るだけ“元のDSTN-LCDの形”を活かしてみようとして注力した物だ。
「LCDパネル」の前に置く「偏光フィルム」や後ろの置く「(位相)補償フィルム」は、まぁまぁちゃんと処置出来たのだが、片方で「バックライト」の再生が上手くなかった。
その主因は、“導光板から出る光”を縦・横方向に絞り込む為の「レンズ・シート」(2枚必要)に、斑点が見える“汚れたモノ”しか残っていなかったことによる。
それの代替品として、大型のLCDモジュールから外してあった綺麗な「レンズ・シート」を使ってみた。
なるほど、明るさは強くなったのだが、表示に“モワレ縞”が目立つようになってしまった。(図10)
原因は、“LCDセルのピッチ”と“レンズシートのピッチ”が、微妙に違っている?あるいは、シート同士の重ね方に微妙なずれがある?...詳細は不明。
このマシンは、「Win95/98」で動作させているが、今は“表示半完成品”の見本として置いてある。
+ 「蛍光管CCFT」を「白色LED棒」に入替 +
これの「DSTN-LCDモジュール」の裏側は、元のままで、特に変わってはいない。(図11)
一方、「バックライト」の方は、元の蛍光管/CCFTを新しいのに替えても、それほど明るくはならなかったので、試しに“CCFT”を“白色LED細棒”に替えてみた。
そしたら、結構、画面が明るくなった♪
それで「CCFT駆動回路基板」は外してしまって、代わりに直列ドロッパ(小抵抗:現在は約4.7Ω)を置いたら、そこはスカスカ!
...甚だ、見栄えのしない風景になった。(笑)
別件だが、本体の左側に刺さっている無線LANカード「WLI-PCM-L11GP」は、以前は“インターネット接続”に有用だったのだが、今はそれも昔噺になってしまっていて、殆ど無用の長物になっている。
他のPC間との“ファイルのやり取り”などに使おうと思えば使えるのだが、かなりまどろっこしい。
現状、ファイルのやり取りなどは、直接的に、CFやPCカードで行っている。
IBM PC110s 現状(1,3) 調べ [2022/12/28] [to English Note]
+++ 「No.1:一郎(5型TFT-LCD)」 +++
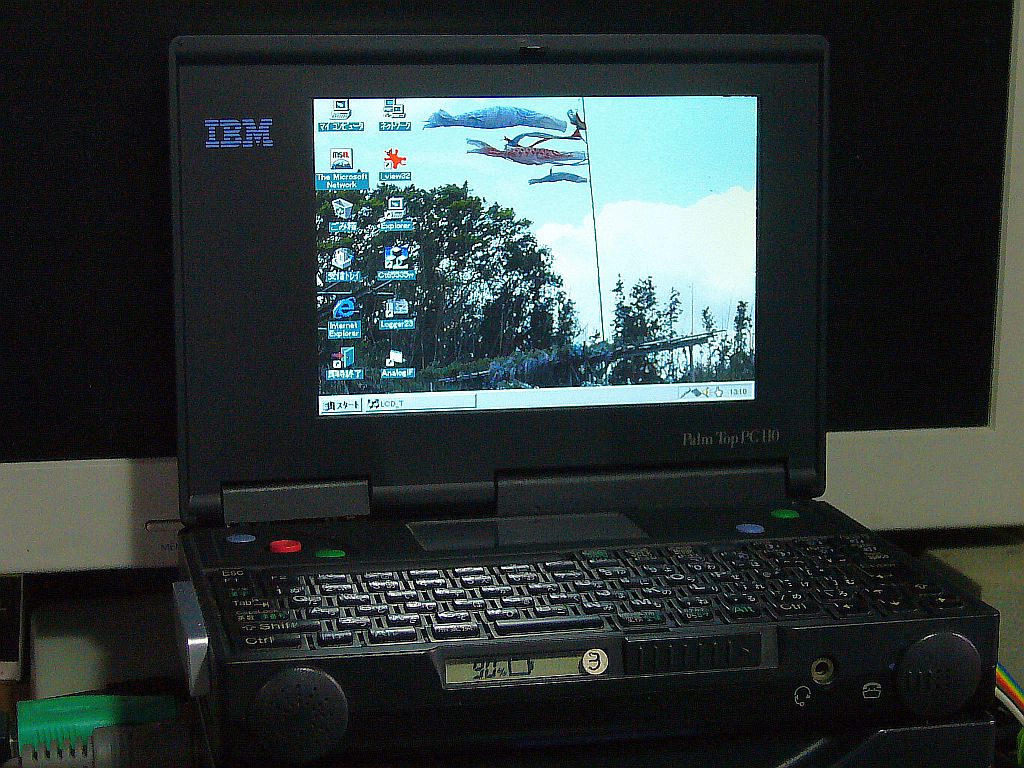
(古い)「IBM PC110」の劣化した「液晶表示器:DSTN-LCD」を、「TFT-LCD」に置き換える試みが、ほゞ上手く行って、固定したのがこのマシン「No.1:一郎」!
そして、今は、このマシンだけが5型WVGA TFT-LCD。
この「5型TFT-LCD」には、WVGA(800x480ドット2)の内、左側のVGA部分(640x480)だけを使って表示させている。
だが、技術の進歩によって、“表示ドット”が昔よりも微細化されているので、表示がVGA画面(640x480)だと、元の4.7型窓枠よりもかなり狭くなってしまう。
止む無く、表示領域の周りを覆うように、黒紙で作った(仮の)“窓枠”を宛がってある。
久しぶりに、これの電源を入れたら、電源は入るが、起動しない!?
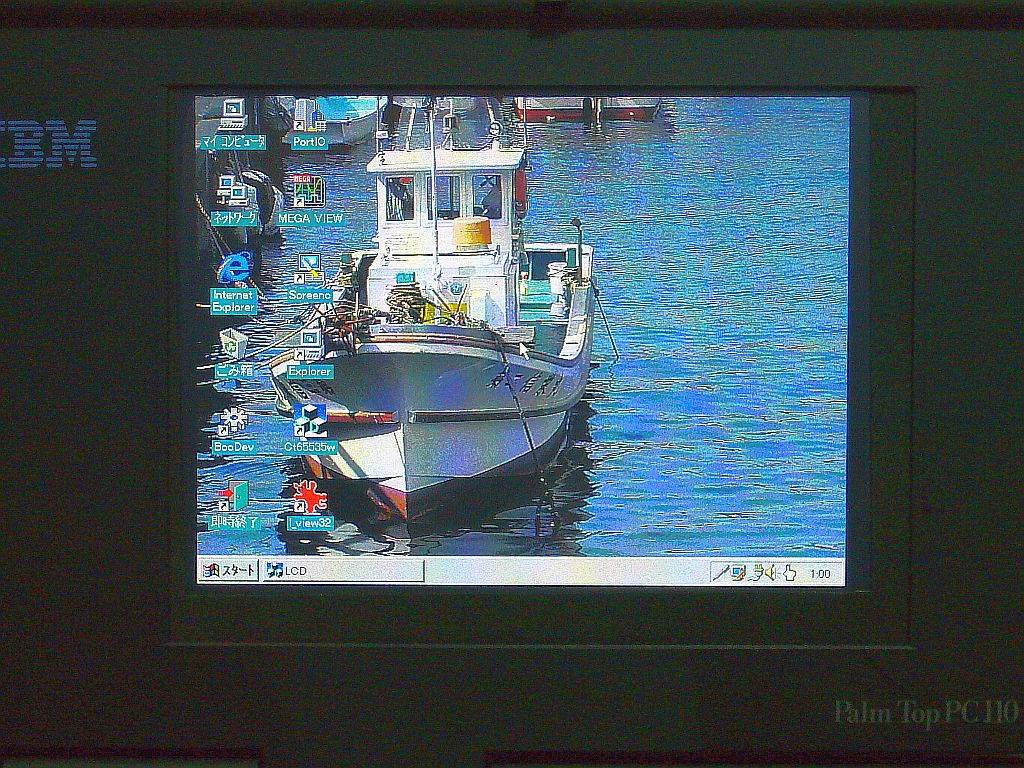
例によって、「ポトリ」に乗せて「外部ディスプレイ」を繋いで、「Easy Setup」で“ドライブの起動順序”を「HDD-2」(Win95-CF側)を先頭に設定し直したら、正常に立ち上がった♪(図1)
(どうやら、新しくした「ボタン電池」の接触が悪く、起動順序がリセットされていたらしい)
+「LCDケース」内+
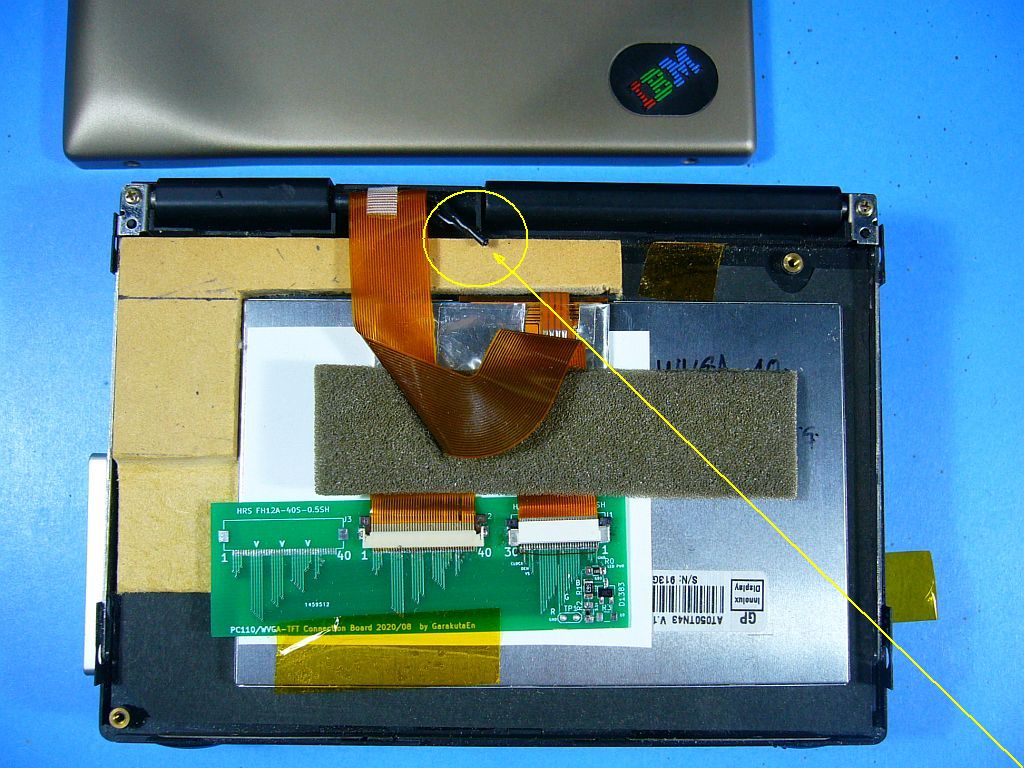
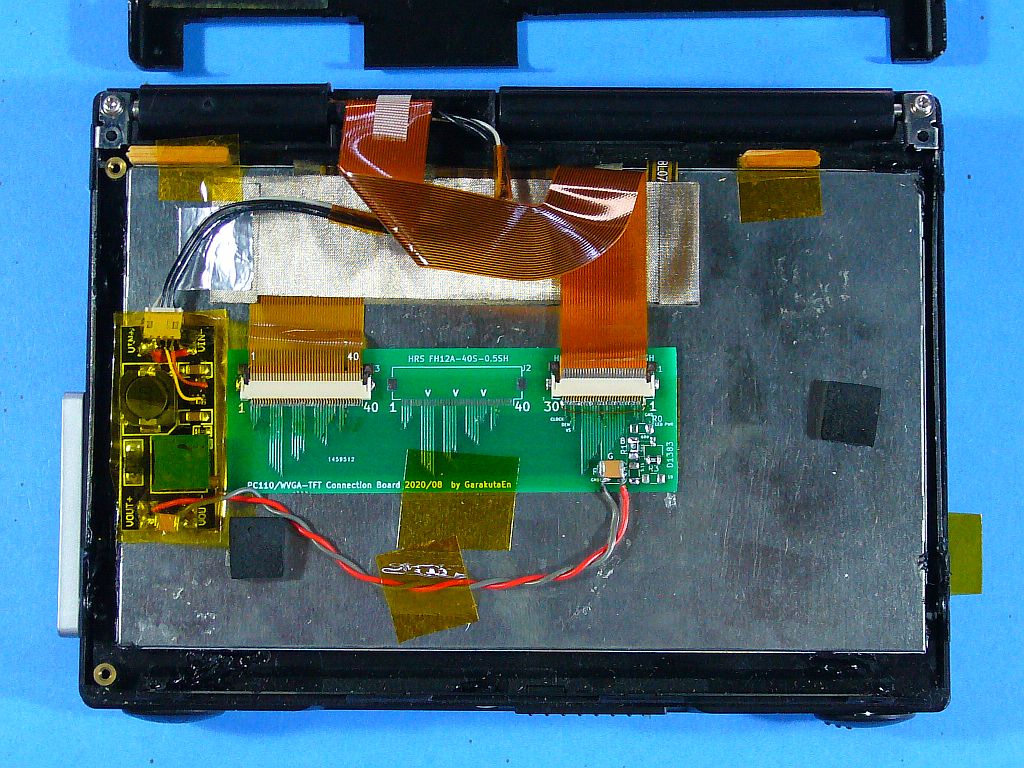
ついでに、接続状態に異常は無いかと、「LCDケース」を開けてみた。(図2)
「5型TFT-LCDモジュール」は、「LCDケース」よりもかなり小さいし薄いので、配置や接続に左程困難は無かった。
と言うか、容易だったので、雑に処置・配置し過ぎたきらいがある。
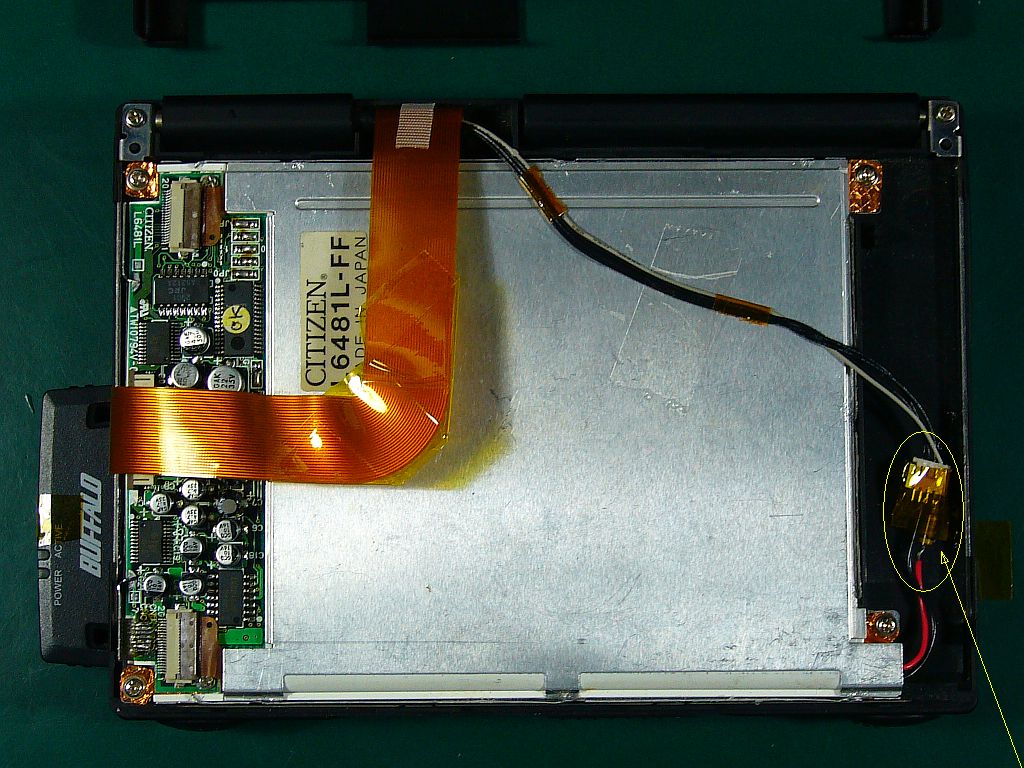
今更だが、「バックライト」用の蛍光管駆動回路用の「電源線」を切ってしまっていたのが悔やまれる。(丸印部)
これは、後で分かったことだが、「TFT-LCD」のバックライトを駆動する上で有用だったのに、その時は、使わないから邪魔だ!と思ってしまった。
この系では、「バックライト」の点灯に、非力な「出力ポート」(STN-LCD駆動用高電圧系)を使っているが、今の処、未だ故障の気配は無い。
「中継基板」は、当初は2枚の「コネクタ付き基板」を手配線で繋いでいたものを、思い切って(慣れない手つきで)“ガーバーデータ”を作成して、基板を(少量生産可能メーカに)外注して製作したもの。
「コネクタ」は別途購入して、自分で半田付けした。
左側は「6型用40pin」(未実装)、中央は「5型用40pin」、右側は「PC110-LCD出力30pin」にしてある。
これの“長期信頼性”は、かなり低いはずだが、“マシン全体の寿命”から見れば、良い勝負ではないかと思う。
+「Pasonaware」のTFT表示+
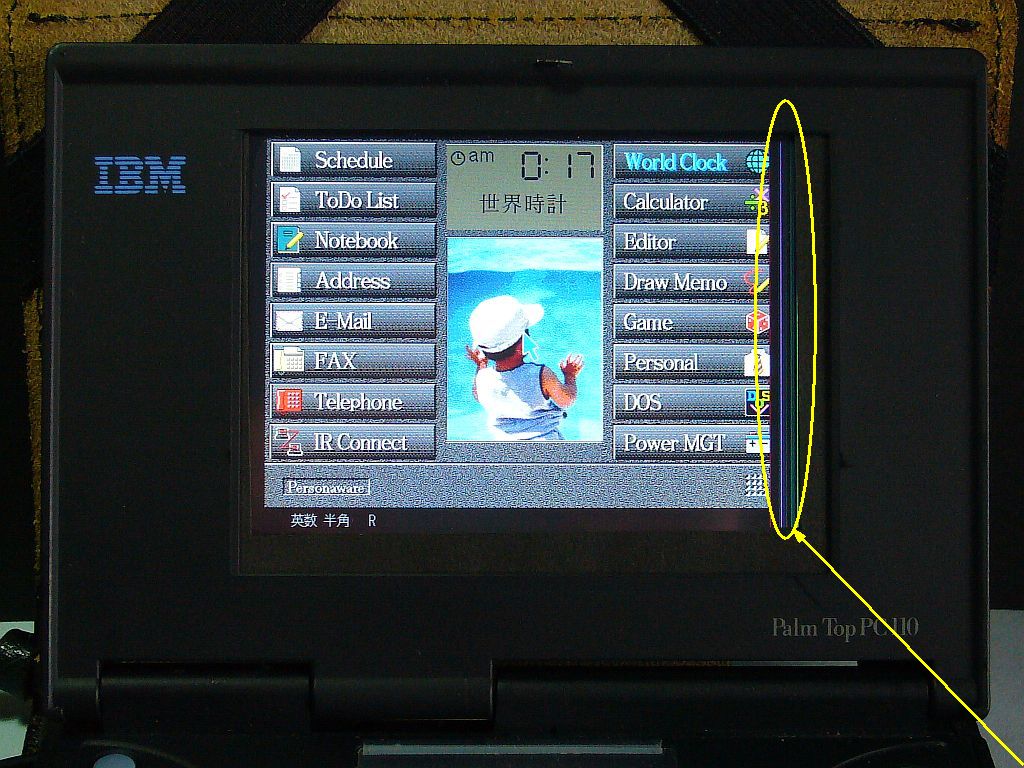
この「No.1:一郎」は、未だ「内部フラッシュ」も健康で、他に“駆動ドライブ”が無ければ、(インストールしてある)「Pasonaware」が立ち上がって来る。(図3)
但し、元のままだと「外部ディスプレイ」には出るが、「5型TFT-LCD」の方には、「バックライト」が明るくはなるものの、画像は何も出ない。
(自作した)「LCD切替用プログラム」ct65535*.exe(*=c、d、f、wなど)を「autoexec.bat」の先頭に書き込んでおいて、早々に実行させれば、TFT画面上に表示が出て来る。
「ct65535*.exe」内のパラメータを色々弄って来たが、残念ながら未だに、「Pasonaware」画面の右端が切れる不具合が直せていない。(楕円印の箇所)
...これは、あまり頻繁には使わないので、このままにしておこうと思っている。
しかし、やはり「5型」は画面が小さい!
...それで、以降、「6型」を追うことになる。
+++ 「No.3:三郎(6型TFT-LCD)」 +++
この「No.3:三郎」は、「6型WVGA TFT-LCDモジュール」を搭載して、ほゞ上手く行ったものの一つ。(図4)
実は、「6型WVGA」だと、元の窓枠が狭いので、その両側を少し(約5mmずつ)削る必要があった。
(只、両側を削る方法は、前から見たレイアウトが少しアンバランスになってしまうので、再考の余地あり)
このマシンは、気に入って良く使っているが、主に「Win95/98」上で、あれこれ試してみたい時に、具合が良い。
また、DOS上で、“PC-DOSプログラム”(ct65535x.exeなど)を作ったり、デバッグすることも多い。
しかし、実際にプログラムを作成する場合は、「6型TFT-LCD」でも、流石に文字が小さくて苦しい。
それで、「ポトリ(ポートリプリケータ)」を置き、後ろに「外部ディスプレイ」を置き、前に「外付けキーボード」、横に「外付けマウス」を置いて、少し楽に作業が出来るようにしてある。
「ポトリ」を固定したこの系は、ほゞ「No.3:三郎」用だが、時に応じて他の本体(PC110)の試験したり、設定変更などをする場合に、載せ替えて使っている。
+ LDCケース内部 +
「6型WVGA TFT-LCD」を“LCDケース”に内蔵させると、一杯々々になる。(図5)
「バックライト電源」には、元の“蛍光管駆動用電源”(約10V)を「コンバータ」で昇圧(約20V)して使っている。
(実は、こうしたモジュールの積み重ねが出来るのも、この「WVGA TFT-LCDモジュール」の厚さが、約4.5mmと比較的薄いからで、厚いモジュールだと、積み重ねるのが難しくなる)
この「6型WVGA」で“VGA画面”を表示させると、当然、表示の左側は「IBMロゴ」の下になってしまう。
(以前、その個所も削った「窓枠」も試してみたが、それは最早「IBM PC110」ではなくなってしまったので、早々とその案は止めた)
幸い、WVGA用LCD(800x480)なので、画面を必要幅だけ右側に移動させれば、元の窓枠内で表示させられると思い付いて、「表示切替プログラム」にオプションで、“画面右シフト機能”を追加してみた。
このマシンでは、オプションmを8、および15にして、
ct65535f.exe /m8(DOS用)
ct65535w.exe 15(Win95/98用)
としている。
...しかし、今見ると、窓枠の左側の表示が少し隠れるので、左側をもう少し削った方が良いかも。
実は、Fn+F7(内部と外部ディスプレイの切り替え)を使うと、TFT-LCD側の表示が異常になって、戻せなくなる(苦い)問題がある。
これは、「ct65535x.exe」(x=f,wなど)を起動すれば、“LCD表示”に戻せる。
(Fnキー・コードを横取りするプログラムが作れたら、こんな変な仕組みは無用なのだが、残念ながら、未だに、Fnキーを横取りする方法を見付け出せていない)
+ 「ct65535w.exe」の実際 +
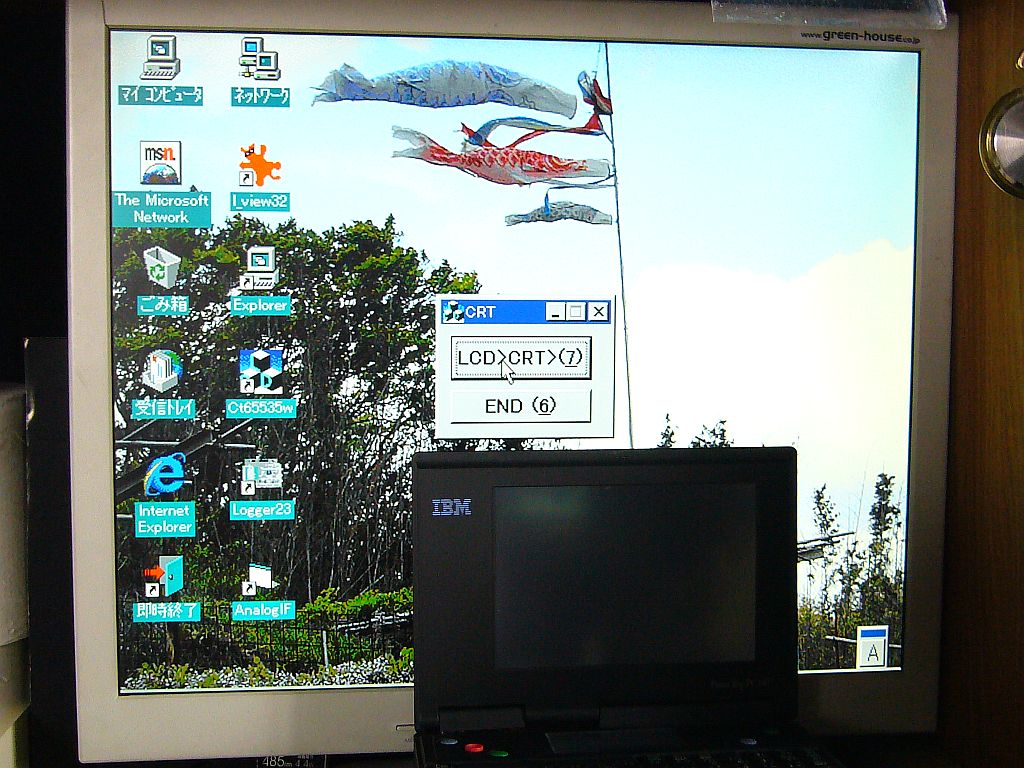
“Win-OS Win95/98”上では、DOS用の「ct65535f.exe」などを実行しても、有効にはならないので、“Win-OS”用に作ったのが「ct65535w.exe」。
で、これは、予め“Win-OS”の「スタート・メニュー」に入れておくと、スタート時、正常なLCD画面が出せる。
(「autoexec.bat」に、DOS用の「ct65535f.exe /mx」を書き込んでおくと、早い段階からLCD表示に出来る)
更に、アイコンをデスクトップ上に作っておいて、それを操作すれば、何時でも表示を内部⇔外部に切り替えが出来る。
LCD画面が崩れたりした時に、これを2回押せば、元に戻せる。(つまり、1回毎に、外部⇔内部ディスプレイに切り替えられる)(図6)
...尚、便宜上「外部ディスプレイ」を「CRT」と表記しているが、他に良い略語が無い故、これで我慢。
IBM PC110s (12,14) Investigation [2022/12/31]

+++ No.12: Kashi (4.7 type DSTN-LCD) +++
Since Progress so far then, "PC-DOS", "Win95" and "Win98", it's working stably.
The "LCD display" is also the same as the original "DSTN-LCD", but (aside from the brightness) it has not deteriorated as much as on the left.
Other than repairing the "LCD control board", I didn't bother to touch any of the hardware, and it remains essentially the "original PC110". (However, the "gourd battery" was removed)
Unfortunately, the "screen brightness" is quite low, so it's hard to see small letters even when I squint (old and nearsighted ).
In addition, the "sound system" is abnormal, and although the sound comes out (it does not stop unless you stop it intentionally) "Motor boarding sound ” (Reference video) is displayed, and it is difficult to use it.
Strangely, even when I run "JV-FAX" which uses "serial communication system", this "motor boarding sound" does not interfere. Then, it becomes "Unable to receive".
I think this "sound problem" is probably a "hardware" problem (not a problem with the driver software, etc.).

+++ "ESS488" driver +++
(This "motor boarding sound" has been occurring for some time, but I have been busy with other matters and have hardly pursued it.)
I suspected the driver from a while ago and tried several others, but it seems that the appropriate driver is "ESS ES488". (Fig.15)
If this driver is not used, the sound will not come out normally, but when the sound starts coming out, a "motor boarding sound" will be heard overlapping it.
. . . Therefore, further pursuit has been suspended for the time being.
(The same problem came up in the next "No.14: Hinoki", so I will think about it later)

+++ No.14: Cypress (4.7 type DSTN-LCD) +++
This "No.14: Hinoki" temporarily had a "TFT-LCD" installed on its display However, after repairing the original "DSTN-LCD" (its "LCD drive circuit board"), it became displayable, so I put this display.
When I put it, "Display ("DSTN-LCD")" also was perfect. It was "beautiful".
However, as usual, the display section deteriorated over time. (Fig.14)
What's more, this machine also had a strange sound system.
There was no sign of it before, but before I knew it, I heard a "motor boarding sound" similar to "No.12: Kongo" is appearing.
The appearance of this machine, including the keyboard, is so beautiful that I wanted to keep it as it is, but it seems like that won't be possible.

+ No damage from battery leakage! +
For now, I opened the back cover and looked around the "gourd battery" mentioned above.
I removed the battery as soon as I received it, but at that time there was no evidence of "corrosion due to battery fluid leakage", and there still is no evidence of it. (Fig.15)
I think that the "motor boarding sound" may be caused by capacity loss in the power supply capacitor of the "sound IC".
So, I searched for "sound-type" ICs using the IC names I picked up a long time ago, and found about two.
@Yellow No.9 IC : Y3014 (YAMAHA DAC)
@Red No.9 IC : ES488 (ESS Audio driver)
. . . However, just by looking at the area, it is not possible to find the "problem area".
I have to take I time and look into it carefully.
IBM PC110s current status (5,9) Investigation [2022/12/30]

+++ No.5: Goro (6-inch TFT-LCD) +++
In this "No.5: Goro", The layout of the (real) window frame of the "6-inch WVGA TFT-LCD" has become almost satisfactory. (Fig.7)
This is because a lot of the left side of the window frame was removed, but in order to "align the screen to the right",
ct65535f.exe /m6 (for DOS)
ct65535w.exe 11 (for Win95/98)
It is as follows.
The "program name" and "option" should be (Win95, 98) [ct65535w xx], and the required right-justification width xx should be specified as a decimal number, for example, xx=11.
To run this program, I had to set first run "PORT95NT.EXE" (free to use and distribute) and install "DlPortIO".
This machine is currently exclusively performing "SSTV reception" using "JV-FAX 7.1" (in DOS mode).
"Interface" (Hamcomm type) is I created it myself with reference to information on the internet.
The "acoustic output" from the "receiver" is divided into "serial output" and "audio output" by incorporating a "distributor" into a plastic box. (Left side in Fig.7)
"JV-FAX" runs easily (?) on DOS of "PC110" with a clock speed of 33~40MHz, but unfortunately the screen the image above is black and white. (Recorded images are in 256 colors)
When the reception condition is good, I can get a very beautiful "picture", so I'm satisfied for the time being♪
(The received image of the photo was borrowed from "JO3RLX" without permission. Thanks!)

+ Contents of "LCD case" +
"No.3: Saburo" was similar, but "Relay board" of "No.5: Goro" was This is the one before the "Final Modification", and the "common GND line" is missing, and this is supplemented with a thin jumper wire". (Fig.8)
(I have already created the final version of Gerber data, but I have not gone as far as making a "board prototype" because it is too troublesome.)
When this machine was running on "Win95/98", the screen would sometimes "slip".
As a countermeasure, I recently acquired "Electromagnetic shielding tape", so I applied it.
So far, I haven't had any "scratching", so it seems to be working.
In addition, black "hot melt bond" is used to fix the "WVGA TFT-LCD module".
This can sometimes come off if a strong shock is applied to it, so care must still be taken.

+ SSTV color image reception attempt +
When I use "JV-FAX", I can get a black and white image, but somehow if i can, I want to get color images, so that is my desire.
I tried receiving and receiving 7.178MHz using "CF" which is "Win98" with "Win95SSTV" installed. (Fig.9)
The "main menu" etc. appear properly, and each button press responds.
However, after the "start input signal", there seems to be a considerable delay in "drawing the received image," approximately in the speed range of 1/3 to 1/4, and the image is tilted. Only comes out.
If the "multiplication period" and "phase" are matched, a somewhat "honest image" may be obtained. . . . Is it not adjustable?
This is probably because "calculation processing" during image conversion takes time. (It's 3 colors, so maybe it's 3 times more monochrome?)
If the "processing speed" were 3 to 4 times faster (CPU clock: 100MHz to 133MHz), I think all images would be drawn a little more beautifully.
. . . Well, I'm asking for something that doesn't exist, but I wonder if it would be possible if the CPU was "i486DX" instead of "i486SX".

+++ "No.9: Kongo (4.7 type modified FSTN-LCD)" +++
"No.9: Kongo" is an attempt to make use of the "original DSTN-LCD shape" as much as possible by replacing the deteriorated "polarizing films". Things I focused on.
The "polarizing film" placed in front of the "LCD panel" and the "(phase) compensation film" placed behind the "LCD panel" worked well, but the "backlight" on one side did not play well.
The main reason for this is that spots can be seen on the "lens sheet" (2 sheets required) that narrows down the "light emitted from the light guide plate" in the vertical and horizontal directions. This is because only dirty things were left.
As a substitute, I used a clean "lens sheet" that I had removed from a large LCD module.
I see, the brightness has become stronger, but "Moire stripes" have become noticeable on the display. (Fig.10)
Is the cause slightly different between the "LCD cell pitch" and the "lens sheet pitch"? Or is there a slight discrepancy in the way the sheets are stacked? . . . Details unknown.
This machine is running on "Win95/98" but it is currently kept as a sample of a "display semi-finished product".

+ Replacement of "fluorescent tube CCFT" with "white LED rod" +
The back side of this "DSTN-LCD module" remains as it was and has not changed much. (Fig.11)
On the other hand, the "backlight" did not become much brighter even after replacing the original fluorescent tube/CCFT with a new one, so I tried changing the "CCFT" to a "white light". I tried replacing it with an LED thin rod.
Then, the screen became quite bright♪
So I removed the "CCFT drive circuit board" and replaced it with a series dropper (small resistance: currently approximately 4.7Ω), and it was empty!
. . . The scenery turned out to be quite unattractive. (lol)
On a different matter, the wireless LAN card "WLI-PCM-L11GP" inserted into the left side of the main unit used to be useful for "Internet connection", but now it has become a joke. It has become a useless item.
If I want to use it to "exchange files" with other PCs, I can use it, but it's quite tedious.
Currently, files are exchanged directly using CF or PC card.
IBM PC110s current situation (1,3) Investigation [2022/12/28]

+++ No.1: Ichiro (5 type TFT-LCD) +++
The attempt to replace it with "TFT-LCD" went pretty well, and the machine that was fixed was "No.1: Ichiro"!
And now, only this machine has a 5-inch WVGA TFT-LCD.
This "5-inch TFT-LCD" uses only the left VGA part (640x480) of WVGA (800x480 dots2) to display.
However, due to advances in technology, the "display dots" have become smaller than in the past, so a VGA screen (640x480) will be much narrower than the original 4.7-inch window frame.
Out of necessity, I placed a (temporary) window frame made of black paper to cover the display area.
When I turned on the power for the first time in a while, it turned on, but it wouldn't start!?
As usual, connect the "external display" on the "Potori" and set the "drive boot order" in "Easy Setup" to "HDD-2" (Win95-CF side) at the beginning, it started up normally♪ (Fig.1)
(Apparently, the new "button battery" had poor contact and the startup order was reset.)

+ Inside "LCD case" +
I also opened the "LCD case" to see if there was anything wrong with the connection. (Fig.2)
The "5-inch TFT-LCD module" is much smaller and thinner than the "LCD case", so placement and connection were not as difficult.
In other words, since it was easy, I tended to treat and arrange things too sloppily.
It's late, but I regret that I had cut off the power line for the fluorescent tube drive circuit for the backlight. (circled part)
I found out later that this was useful for driving the backlight of the TFT-LCD, but at that time it was a nuisance because I wasn't using it! That's what I thought.
This system uses a powerless "output port" (high voltage system for driving the STN-LCD) to turn on the "backlight," but there is no sign of any failure so far.
"Relay board" was originally made by connecting two "boards with connectors" by hand, but I took the plunge (with unfamiliar hands) and created "Gerber data".
The board is manufactured by outsourcing (to a manufacturer that can produce in small quantities).
I purchased the "connector" separately and soldered it myself.
The left side is "40 pin for 6 type" (not installed), the center is "40 pin for 5 type", and the right side is "PC110-LCD output 30 pin".
The "long-term reliability" of this should be quite low, but from the "life of the entire machine" I think it's a good match.

+ TFT display of "Pasonaware" +
This "No.1: Ichiro" still has a healthy "internal flash" and if there is no other "driving drive" (installed) " Pasonaware" comes up. (Fig.3)
However, if it is left as is, it will appear on the "external display", but on the "5-inch TFT-LCD", although the "backlight" will be brighter, no image will appear.
Write (self-made) "LCD switching program" ct65535*.exe (*=c, d, f, w, etc.) at the beginning of "autoexec.bat" When I run it as soon as possible, the display will appear on the TFT screen.
I've been playing with various parameters in "ct65535*.exe", but unfortunately I still have a problem where the right edge of the "Pasonaware" screen is cut off has not been fixed. (Oval marked area)
. . . I don't use this very often, so I think I'll leave it as is.
However, the 5-inch screen is still small!
. . . So, from now on, we will pursue "Type 6".

+++ No.3: Saburo (6-inch TFT-LCD) +++
This "No.3: Saburo" is one of the ones that was installed with a "6-inch WVGA TFT-LCD module" and was successful. (Fig.4)
In fact, with the 6-inch WVGA, the original window frame was narrow, so I had to shave off a little bit (approximately 5mm each) on both sides.
(However, the method of cutting both sides makes the layout a little unbalanced when viewed from the front, so there is room for reconsideration.)
I like this machine and use it often, but it's mainly useful when I want to try various things on "Win95/98".
I also often create and debug "PC-DOS programs" (ct65535x.exe, etc.) on DOS.
However, when actually creating a program, even with a 6-inch TFT-LCD, the font size is extremely small, making it difficult.
So, I put a "Potri (port replicator)", "External display" in the back, "External keyboard" in front, I placed an "external mouse" next to it to make working a little easier.
This system with fixed "Potori" is mainly used for "No.3: Saburo", but depending on the case, it can be used for other main bodies (PC110). I use it by replacing it when testing or changing settings.

+ Inside LDC case +
When a 6-inch WVGA TFT-LCD is built into an LCD case, it becomes completely full. (Fig.5)
For "backlight power supply", replace the original "fluorescent tube drive power supply" (approximately 10V) with " converter" to boost the voltage (approximately 20V) and use it.
(Actually, the reason why such modules can be stacked is that the thickness of this "WVGA TFT-LCD module" is relatively thin at approximately 4.5 mm. =_blank rel=noopner>Thick modules will be difficult to stack)
When the "VGA screen" is displayed on this "6-inch WVGA", the left side of the display will naturally be "IBMlogo".
(Previously, I tried cutting out the "window frame", but it was no longer "IBM PC110"), so I quickly changed the idea. stopped)
Fortunately, since it is a WVGA LCD (800x480), I figured out that if I move the screen to the right by the necessary width, I can display it within the original window frame, so I added the "Screen right shift function" as an option in the "Display switching program". I tried adding
On this machine, with option /m8, and 15,
ct65535f.exe /m8 (for DOS)
ct65535w.exe 15 (for Win95/98)
It is said that
. . . However, if some look at it now, the display on the left side of the window frame is hidden a little, so it might be better to shave off the left side a little more.
Actually, if used Fn + F7 (switching between internal and external display), the display on the TFT-LCD side will become abnormal, and there is a (bitter) problem that you will not be able to change it back.
This can be returned to the "LCD display" by starting "ct65535x.exe" (x=f,w, etc.).
(Fn key code intercepted)f I could create a program to do this, such a strange mechanism would be unnecessary, but unfortunately I still haven't found a way to intercept the Fn key)

+ Actual “ct65535w.exe”+
On "Win-OS Win95/98", even if you run "ct65535f.exe" for DOS, it will not be effective, so I created "ct65535w.exe".
Putting this in the "Start Menu" of "Win-OS" in advance, a normal LCD screen will appear at startup.
(If "ct65535f.exe /mx" written for DOS in "autoexec.bat", it'll switch to LCD display from an early stage.)
Furthermore, by creating an icon on the desktop and operating it, it'll switch the display from internal to external at any time.
If the LCD screen collapses, it must be by pressing this twice.(In other words, you can switch from external to internal display each time)(Fig.6)
. . . For convenience, "external display" is written as "CRT", but since there is no other good abbreviation, I'll stick with this.
灯油缶キャップ割れ 不覚 [2022/12/25]
![図1:割れていたキャップ2個 [click]→図2:キャップの下にポリ・シートを挟む](fig/msm1225a.jpg)
+++ 車内が灯油臭い +++
先週、車で灯油を(ポリ・タンク3缶)買いに行って帰ってから、車内が何時もよりずっと“灯油臭い”ことが気になったが、まぁ、その内消えるだろうと思っていた。
だが、数日経っても消えないので、「ポリ・タンク」を置いていた後部座席の「フロア・マット」を嗅いでみたら、結構臭い!
取り敢えず、その「フロア・マット」を外に引きずり出して“日陰干し”にしておいたのだが、車内にはまだ“灯油の臭い”が残っている。(マイッタ!)
今日、改めて「ポリ・タンクの蓋」を確認したら、2個も割れていることが判った!(図1 ギョッ!)
きっと、ここから多量?に漏れ出して、車内の後部座席の“床”に飛び散った為だろうと思う。
(車のシート群には、シミなどは見当たらなかったが、「ポリ・タンク」を包んでいた袋内には、灯油がベッタリ!更に袋の底にも穴がある!?)
灯油を買った時には、“必ず、蓋の締まりをご確認下さい!”との注意があるので、怠り無く“増し締め”するのだが、その時には蓋の割れなどには気が付かなかった。
...ポリエチレン製蓋は、かなりの強度はありそうに見えていたが、こんな風に割れることもあるんだ!不覚だった!と、慨嘆しきり。
もしかして、この蓋、“粗製乱造・低価格”がモットーのC国製なのかな?
代替用として、(質が保証された国産)良品が、DIY店内では見付けられなかったので、安価なもの(1個百円)を買って来たが、これも、また割れるのが心配だ。
それで、念の為、“注吸口”を「ポリエチレン・シート」でカバーして、それを締めるようにしてみた。(図2[クリック])
頻繁に開け閉めする箇所では、そのシートも直ぐに擦り切れるだろうから、暫時取り替えねばならないが、“代替用シート”には困らないから、この方法を続けてみるつもり。
SSD 2TB SiliconPower A55 入替 [2022/12/19]
![図1:「SiliconPower A55」のベンチマーク(CDM8.0による) [click]→図2:「Hitchi_HDD 1TB」のベンチマーク(CDM3.0による)](fig/msm1219a.jpg)
+++ SSD 2TB:HDD 1TB on VY24A/W-5 +++
メインPCとして「VY24A/W-5」という旧いマシンを使っているが、画面は少し暗くなって来ているものの、今もって健康体だ。
だが、貯蔵容量が次第に不足して来たので、「HDD」容量を順次1TBにまで増やしたが、“遅さ”は感じていた。(図2[クリック])
ある時、試しにそれを「SSD 1TB Crucial MX500」に替えたら、一気に処理が速くなった。(図4[クリック])
しかし、ドライブレコーダなどの動画を貯めるようになってから、容量不足が更に加速して来たので、今回、「SSD 2TB SiliconPower A55」に増やしてみた。(図1)
本体の“SATAインターフェース”が旧いタイプらしいので、ベンチマーク「CrystalDiskMark」(8.0&3.0)で(メーカーが謳う)500MB/sは到底望めないだろうが、“シーケンシャル読み書き”が200Mb/s台だから、まぁ良しとしよう!
また、“ランダム読み書き”が2ケタ台なのは、少し低いが、仕方がないのかもしれない。
使用実感としては、まぁまぁ満足!(本体が本体だから、これ以上は望めない)
![図3:「SunEast SE900」のベンチマーク(CDM3.0による) [click]→図4:「Crucial MX500」のベンチマーク(CDM3.0による)](fig/msm1219c.jpg)
+++ SE900 2TB:MX500 1TB on VY24A/W-5 +++
実は、「SSD 2TB」を買うに当たって、一度、間違った買い物をした。
少し安かったし、ネット上で大変好ましいデータ群を拝見していたので、「SSD 2TB SunEast SE900」を買ってみたが、これが、実際に働かせてみると、何だか“遅い”のだ。
マシン本体の“低性能さ”が関係しているのかもしれないが、それでも、現用中の「SSD 1TB Crucial MX500」よりも処理速度が低い感じがしたので、ベンチマーク値を比べてみた。(図3 & 図4[クリック])
やはり、「SE900」の“ランダム読み書き”が1桁台だったので、もうたまらず、“返品・返金”(¥12,900税・送料込み)をして貰って、それに追金をして、品質管理が確実とみた上記SiliconPower製品(¥15,291税・送料込み)を“購入”した。
ネット上で紹介されている「SE900」のベンチマーク値は、恐らく、正しい値なのだろう。
そして、私が採った値も間違ってはいないはずなので、多分、(出荷検査を省いた?)“外れ製品”に当たったのだろう(と勝手に想像している)。
ならば、もう一度“同じ製品”に交換したら、今度は“当たり製品”に当たるかもしれないし、或いは、“また、外れ!”かもしれない。
...でも、ディスク内容の転写に、毎回7〜12時間も掛けるのは、疲れる!やはり、こんなのは、一発で決めたいものだ。
[後日談](2023年1月)
何故か、この「Silicon Power 2TB」、段々調子が落ちて“プチフリ”が酷くなって来た。
“SSD”なのに“HDD並み”に実動速度が低下しているので、もう使いたくない!
で、早々と以前の「Crucial 1TB」に戻した。
銀食器 汚れ除去 未完 [2022/12/17]
![図1:一向に綺麗にならない銀カップ [click]→図2:使ってみたクッキング用アルミ箔](fig/msm1217a.jpg)
+++ 表面加工されたアルミ箔 +++
食器棚の奥の方に鎮座していた「銀カップ」が、偶々目に付いたので、取り出してみたら、汚れが酷い!
これを綺麗にしてやろうと、色々やってみたが、あまり綺麗にならず。(図1)
銀食器は柔らかいので、(硬い)研磨剤で擦るのは御法度!
先ずは、(柔らかい)“重曹粉”を指に付けて擦ってみたが、多少汚れは落ちるものの、左程綺麗にはならない。
(やおら本腰を入れて!?)“電気分解法”(或いは、“イオン化傾向差−利用法”かな?)を試してみようと、“台所のアルミ箔”を鍋の底に敷いて、“重曹水”を沸騰させ、その中へ「銀カップ」を入れて様子を見た。
これは、あまり反応が見られず、汚れも落ちなかった。
次に、“食塩水”に替えて、これも沸騰させて、“アルミ箔”の上に「銀カップ」を乗せて20分間程様子をみた。
それらの表面に細かい泡が立つのが見られたが、結果、それ程汚れは落ちていない。
どうも、使った今時の“クッキング用アルミ箔”は、表面が樹脂加工されているようなので、“電気分解”用には不適なのだろう。(図2[クリック])
ちゃんと、“真正アルミ表面が出ているアルミ箔”を探す必要がある。
...綺麗になったら、これで“ワイン”でも飲んでみるかな?
電話機鳴音 低減 [2022/12/11]
![図1:スリムさが気に入った電話機 [click]→図2:通常品に比べて、幅およそ半分!](fig/msm1211a.jpg)
+++ スリムな電話機 +++
PCサブ機の傍に置いておく電話機(2階用 有線式)として、出来るだけスリムなものが欲しかった。
(1階用 無線式子機は、1階で多用するので、2階用には使えず)
以前は、プッシュボタンが送受話器側に付いている“細身の小型電話機”を使っていたのだが、あれは相手側が、(例えば)“1番を押してください!”と言ってくると、一々送受話器を(耳から離して)ボタンを押さねばならないので、不便だった。
次に、普通型に替えたのだが、やはり、それだと机上が狭くなり、マウスなどの操作範囲が狭くて煩わしい。(図2[クリック]の右側)
今回、やっと望みの幅のものを見付けたので、(相場より少し高いと思ったが)意を決して買ってみた。
(オーム電機製TEL-2990S ¥2,260送料込み)
新古品らしく、箱入りで、全体は綺麗だったし使い易そうで、気に入った♪(図1)
ところが...
![図3:音量調節用回路を付加した [click]→図4:直列抵抗0R6:3.9KΩでは不足?!](fig/msm1211c.jpg)
+++ 鳴音(呼出音)の調節 +++
電話が掛かって来た時、ビックリする程、甲高い大音量(?!個人の感想)だった。
...[呼出音量]を“小”にしてあるのに、こんな音質&音量では、かなわん!
改善出来るかどうか調べてみようと、中を開けてみた。
(中を触ると法令に抵触するらしいが、“本回線”には触らないから、目零しをして貰おう)
「音量切替スイッチ」付近の回路を見ると、音量低減の為に、直列抵抗0R6-3.9KΩを入れるようになっていた。(図4[クリック])
更に音量を絞るには、この抵抗値を大きくすれば良いはず。
手持ちの中から、取り付け易さやサイズを考えて、50KΩの小型角型の可変抵抗器VRを、シャフトの頭を切って縮めて、組み込んでみた。(図3)
これだと、納まり具合は良いし、音量抑制に関しても、ほゞ満足♪
VRを一杯廻しても、“鳴音”を完全には絞り切れていないが、このレベルならビックリさせられることも無さそう。
また、“音量大”にしておけば、大音量で鳴るので、別室に居てもよく聴こえる。
「白石畑」→「三里」(平群) 踏破 [2022/12/09]
![図1:「白石畑」入口の「案内標識」(「Googleマップ ストリートビュー」から拝借) [click]→図2:踏破したコース(緑色線)](fig/msm1209a.jpg)
+++ 「近畿自然歩道」を試歩 +++
時々「白石畑」を車で通り抜ける際に、以前から気になっていた「案内標識」[←近鉄 平群駅 松尾寺→ 環境省・奈良県]のある“山/歩道コース”を、試しに(始めて)歩いてみた。(図2[クリック])
もう少し若ければ、近くの「近鉄」や「JR」の駅から歩いて登ることも考えたろうが、今はもう、それ程の“(健)脚力”も無いので、「JR 王寺駅」から、タクシー(料金¥2,570)を使ってその「案内標識」の所まで行き、其処から(少し登ってから、)降った。(図1)
道は、雑草や倒木などは綺麗に除かれていて、定期的に整備されているようだった。
しかし、“下り”は急傾斜な所が多い上に、今の時期は“落ち葉”が多いので、結構滑り易かった。
(お陰で?二三度、滑って“尻餅”を搗いてしまった)
途中に有るかもしれない「三里城址」が見付けられるかな?と思っていたが、良く分からず。
兎に角、(急坂なので)脚がガクガクで、探し廻る余裕など無し。
もしかしたら、坂道の終わり辺りの「丸木小橋」の手前の「石柱」がその目印だったのかも。
およそ15〜20分間の“山道コース”だが、途中に“展望が開ける場所”も無く、淡々と茂みの間の急坂を降るのみだから、私のような“物好き人間”でなければ、あまり面白くもないだろう(/かもしれない)。
だが、もし、このコースを自分で作るとしたら、大変な労力を必要としただろうと思うから、工事をされた人達や保守をされている方達の労苦に敬意を表したい。
![図3:手持ち撮影に使った「ドライブレコーダ用ビデオ・カメラ」と「補助バッテリ」 [click]→図4:映像編集には、旧版「Microsoft製ムービーメーカー」を使用](fig/msm1209c.jpg)
+++ 撮影はドラレコ・カメラを利用 +++
今回、一度試したかったのは、歩行用にも「自動車用ドライブレコーダー・カメラ:INJ-144」が使えないかってことで、「補助バッテリ」をくっ付けて、片手で持って歩いて撮影してみた。(図3)
「YouTube動画:白石畑→三里踏破」
「レコーダー映像」は、3分間刻みにしてあるので、後で全部を繋ぎ合わせねばならない。それを、「2倍速」にして、更に「ブレ補正」を加えた。
その編集に、旧版「Microsoft製ムービーメーカー」を使用した。(図4[クリック])
(この程度の記録用動画なら、このソフトVer.2012で、十分だと思う)
「編集マシン」に、「NEC製VersaPro VY24A/W-5 Core2Duo Win10 4GB」を使おうとしたが、“ブレ補正”をするとエラーが出て、ちゃんと編集出来ない。
(“ファイルが無くなる”んだそうな)
それで、マシンを「Fujitsu製LifeBook A573/G Core5 Win10 4GB」に替えて、作業をした。
(“エラー解消”には、メモリ容量の増大ではなく、“CPU能力”の方が大きく効くらしい)
やはり、“映像”は、“手持ち”だと、“手振れ”が酷いが、「ムービーメーカー」の“ブレ補正”を掛けると、かなり/随分緩和される。
(とは言え、「YouTube」上で拝見するような安定した動画映像には比べるべくもないが、自分の為の記録/記憶補助用とすれば、これで十分♪)
看視カメラ 6台 現況 [2022/12/06]
![図1:同時動作は6台が限度か? [click]→図2:現在、接続してあるのは8台](fig/msm1206a.jpg)
+++ USB看視カメラ +++
毎日、電源を入れて表示させてはいるが、それほど念入りには看視していない「看視カメラ群」なのだが、先日通り掛かりの人から、“あれは、監視カメラですか?実は、以前盗難に遭ったので、自宅に備えようかと思って...”と尋ねられたので、改めて、現状を見直してみた。
これらが“盗難予防”に効果があるかどうかは、今の処、(結果が不詳で)未だ良く分からない。
(1台2台だと“ダミーだろう!”と多寡を括られるかもしれないが、)これだけ多いと、中には本物が1、2台混じっているに違いないと(敵に)警戒させられるはず!(かも?)
この看視カメラ系は、運用開始から約3年半が経過した。
所々、時々、不具合は発生するが、その都度手直しをしているので、概ね安定して動作している。
しかし、現状では、カメラ8台を(図2[クリック])接続しても、それら全部の“映像表示”が難しくなっていて、今ではもう、6台が限界らしい。(図1)
その原因は、(PCのUSB端子から)5m先の(外気中の)「USB-HUB群」や「カメラ群」の“(緩やかな)劣化/速度低下”ではないかと想像している。
...まぁ、現状では、4台+1台(別PCで表示)で十分なので、このまま維持しようと思っている。
「プログラムUcam12.exe」は、日付などを小修整して、新しく「Ucam10.exe(Ucam10.zip:cv200.dllなど4つのdllを含む)」を作成した。(USB系特有の「USBタスク」の“完全停止”が出来ない時がある、という不具合は取り除けていない。停止には、“電源OFF”が手っ取り早い)
![図3:WANSCAMカメラの映像 [click]→図4:活動可能だったIPカメラ](fig/msm1206c.jpg)
+++ 活きていたIPカメラ +++
以前、「Adobe Flash Player」のサポートが終了してから、「WANSCAM製IPカメラ」が使えない(映像が出ない)状況になって、ずっと放置してあった。(図4[クリック])
それを、先日“ブラウザ”として旧い「IE8」、「IE11」を使って、アドオンを足してみたら、映像が出るようになった!(図3)
この「IPカメラ」は、カバー範囲は狭いが、“精細度”が高く、“首振り”が出来るので、路上で立ち止まっている“不審者?”を観察するのに使えるので、具合が良い。
...まぁ、実際には“不審者”などではなくて、“小犬と散歩中の人”だったりして、“拍子抜け”するのだが。(苦笑)
これは、時に応じて、使うことにしている。
(尚、この(ガラス製?)「カメラカバー」の内側に貼ってあったラベルが、(糊が劣化して)剥げ落ちたらしく、レンズの前にへばり付くことがある。それで、視野をあまり大きく振るのは避けているが、いずれ、カバーを外して清掃しないといけないだろう)
![図5: [click]→図6:](fig/msm1206e.jpg)
+++ (別)USBカメラ「UCAM-C0220FBNBK」は不可 +++
現在、複数台同時動作させられるのは、「Logicool製」が殆どで、他社のカメラで同時動作には、あまり相性が良くないことが、判っている。(例外は、Microsoft製)
でも、もしかして可能か?と思い、先日、「Elecom製UCAM-C0220FBNBK」を2台買ってみた。(図3)
...だが、やはりこのタイプの“USBカメラ”は、Logicool製との相性も悪いし、これら2台以上の並列動作は不可だった。(映像が取り出せない!)
旧型「Logicool製カメラ」(図6[クリック])の殆どが“並列動作”に使えるが、同一機種を複数にすると、(該社製の「制御ソフト」を使う場合は)その内の一台のカメラしか“制御設定”が出来ず、その他は設定出来ないので、大変不便!
今の処、カメラ群は「Logicool製」で、殆どを別機種にしてある。(同じ機種は、別USBラインに置いてある)
(自前で、“個別・制御用ソフト”を作れば良いのだが、今は力及ばず、じっと手を見る)


![図1:割れていたキャップ2個 [click]→図2:キャップの下にポリ・シートを挟む](fig/msm1225a.jpg)
![図1:「SiliconPower A55」のベンチマーク(CDM8.0による) [click]→図2:「Hitchi_HDD 1TB」のベンチマーク(CDM3.0による)](fig/msm1219a.jpg)
![図3:「SunEast SE900」のベンチマーク(CDM3.0による) [click]→図4:「Crucial MX500」のベンチマーク(CDM3.0による)](fig/msm1219c.jpg)
![図1:一向に綺麗にならない銀カップ [click]→図2:使ってみたクッキング用アルミ箔](fig/msm1217a.jpg)
![図1:スリムさが気に入った電話機 [click]→図2:通常品に比べて、幅およそ半分!](fig/msm1211a.jpg)
![図3:音量調節用回路を付加した [click]→図4:直列抵抗0R6:3.9KΩでは不足?!](fig/msm1211c.jpg)
![図1:「白石畑」入口の「案内標識」(「Googleマップ ストリートビュー」から拝借) [click]→図2:踏破したコース(緑色線)](fig/msm1209a.jpg)
![図3:手持ち撮影に使った「ドライブレコーダ用ビデオ・カメラ」と「補助バッテリ」 [click]→図4:映像編集には、旧版「Microsoft製ムービーメーカー」を使用](fig/msm1209c.jpg)
![図1:同時動作は6台が限度か? [click]→図2:現在、接続してあるのは8台](fig/msm1206a.jpg)
![図3:WANSCAMカメラの映像 [click]→図4:活動可能だったIPカメラ](fig/msm1206c.jpg)
![図5: [click]→図6:](fig/msm1206e.jpg)