�Ƃ茾�W�@�ߘa��N������
AC�A�_�v�^�@�C���@�@�@[English Note]�@�@�@�@�u8��20���v
�{�{�{�@�������ɂ͋����Ȃ��I�@�{�{�{
�uPC110�v�W�����N�i�ꎮ���A���ɗ���ŁA���郋�[�g���甃���Ė�����B
���̒��ɃI�}�P�Ƃ��ē����Ă������̂̒��ɁA���́uIBM�� ����AC�A�_�v�^�v���������B
�R�[�h�[�����f�����Ă����̂��C�����Ă����炵���A�r�j�[���E�e�[�v�ł��邮�銪���ɂ��Ă������B
���̂܂ܕۑ�����ɂ��Ă��A�C�������ǂ��Ȃ��B�i�}�P�j
�C�����Ă݂邱�Ƃɂ����B
�k���́A�ׂ��h���C�o����������ŁA���őł�����A�ȒP�Ɋ���ڂ��o����B
�������ŁA���������A�J�o�[��2�Ɋ����̂ŁA�R�[�h���[�̏������o����B
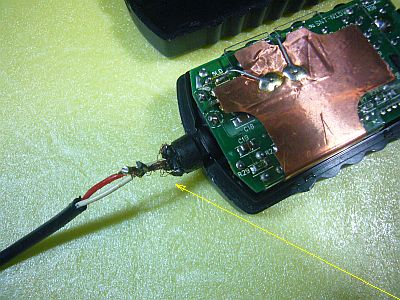
��́A�O���̃R�[�h�̈������荞�݂ƁA���c�t���A�����āA�ĕ������B�i�}�Q<�N���b�N>�j
�{�{�{�@�R�[�h�̈������݁@�{�{�{
���̏C���ŁA��Ԗ��Ȃ̂́A"�R�[�h�̈�������"���낤�B
���X�A�����Ȃ��悤�Ɂu�S���E�u�b�V���O�v�ŗ��߂Ă���R�[�h����A���ֈ������ނ̂ŁA���������ƁA������Ă��܂��|�ꂪ����B
�y���`�Œ͂�ŁA�T�d�ɁA�����ċ����������B
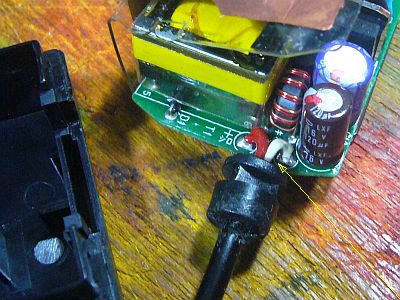
�ł��A�����ė���̂́A����2�{�������ŁA�O��܂ň������ނ͓̂�������B�i�}�R�j
�������A��Ō��āA�O��̗ڂ��܂��c���Ă����̂ŁA�o����Ζ�����ɂł��A��������ł����������ǂ��������ȁH�I�Ǝv�����B
�i�����������낤�H�́A�܂��ǂ��Ȃ��I�j
�o�͓d�������čŏI�m�F�������B�i�}�S<�N���b�N>�j
����́A"�i�v�ۑ��i"���ȁB�i��j
�D�D�D���܂�O�ς͗ǂ��Ȃ��̂ł����߂������͂Ȃ����A����ł��\��Ȃ�����A�i�����Łj�~�����Ƃ������́A�u�ꌾ���v�́mprivate�n��"���Ȃ��̘A����"�������ē������Ă��������B
�|�|�|�|�|�|�|�|�|�|�|�|�|�|�|�|�|�|�|�|�|�|�|�|�|�|�|�|�|�|�|�|�|�|�|�|�|�|�|
AC adapter repair�@�@ "August 20"

+++++ I can't stay without fixing it ! +++++
I asked my daughter to buy a junk set of "PC110" from a certain route.
Among the things that were included as a small bonus, there was this "semi-destructive AC adapter of IBM".
It seemed to be repairing the broken wire at the end of the cord, and it was wrapped in vinyl tape.
Even if it is saved as it is, it does not feel good. (Fig_1)
I decided to repair it.
The shell split can be easily cracked by inserting a thin screwdriver and driving it with my palm.
When I do it in several places, the cover will split in two, so I can treat the ends of the cord.
After that, pulling in the outer cord, soldering, and resealing. (Fig_2 <click>)

+++++ Pulling the code +++++
The most troublesome thing about this repair is "pulling in the code".
Originally, I tried to pull in the cord that was fixed with a "rubber bushing" so that it would not move.
Grab it with pliers and pull it carefully and hard.
But it was only the two cables that came in, and it was difficult to pull in the outer skin. (Fig_3)
However, as I looked at it later, there were still cracks in the outer skin, so it would be better if I could pull it in, even if I could force it. !! I thought.
(Isn't it good already ? ... No! not yet !)
The final confirmation was made by looking at the output voltage. (Fig_4 click)
This is a "permanent preservation product".
I don't want to recommend it because it doesn't look very good, but if you want it (for free), you can get it. Please write "your contact" and submit from [private] of "�ꌾ�� S (BB&PBOX)".
�|�|�|�|�|�|�|�|�|�|�|�|�|�|�|�|�|�|�|�|�|�|�|�|�|�|�|�|�|�|�|�|�|
�g��J�����@�����@�@�@[English Note]�@�@�@�@�u8��6���v
�{�{�{�@�S�s���ڑ��o���Ă��邩�H�@�{�{�{
�ڑ��p�[������ꂽFPC�iFlexible Printed Circuits�j�ɁA�u�R�l�N�^�v��t���āA�ڑ����o���Ďg����悤�ɂ��悤���H�������̂����A�܂�"�ڑ����"�Ɋm�M�����ĂȂ��B�i�}�Q<�N���b�N>�j
�����ŁA"���E���|�p�J����"�i130����f���P,�S�U�O�������݁j���āA�莝�����[�y�ł͌���p�x����A���������ڍׂɌ��Ă݂悤�ƍl�����B
�������A������ߏœ_�^�Ƃ͂����A��cm�����Ȃ���ΑN���ȉf���͓����Ȃ��̂ŁA�\���Ȋg�呜�͓����Ȃ��B
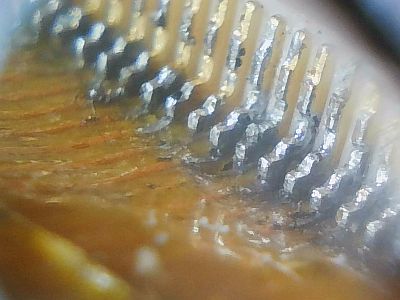
�~�ޖ����A�X�}�z�p��"���C�h�������Y"�̒��̓ʃ����Y���A���H����"�ɋߏœ_�A�_�v�^"�ɂ��āA�ڑ����̊g�呜�������B�i�}�P�j
"�v���X�`�b�N�E�����Y"�ׂ̈��A�f���͍����N���ł͂Ȃ��̂��A�ʂ���B
�ڑ��o���Ă��Ȃ��悤�Ɍ�����[�q�����邪�A"����p�x"��"���̓��ĕ�"�ɂ���Ă��A����Č�����̂ŁA�܂��A�m�M�����Ɏ��炸�B
�{�{�{�@�g��J�����ɕ⏕�����Y�@�{�{�{
���\�������邽�߂ɁA�����J�����Ȃ����Ă݂͂�̂����A�Ȃ��Ȃ����Ғʂ�̂��͖̂����B
���������̂́A��f���������̂ŁA�����̓}�V���낤�Ǝv�����B
�����A�����ł́uLED�Ɩ��v���肪��������Ă��邪�A�{���͕K�v�Ȃ͂��́u�œ_�����@�\�v�������B
����A���͂���Ɂu�⏕�����Y�v��t���āA�X�ɋߏœ_�����Ă݂��B
���̃����Y�́A�펋�̂ɏo���邾���ߕt����ɂ́A���a������������K�v������B
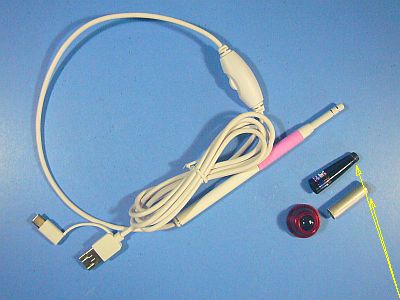
�K���i�H�j�g���������Y�̓v���X�`�b�N���Ȃ̂ŁA�u�O���C���_�v���g���ΊȒP�ɐ��`�o����B�i�}�S<�N���b�N>�j
����́A�������߂����悤�����A���ꂭ�炢�ł��A�߂��猩�����ꍇ�ɂ́A�ז��ɂȂ�B
�u�����Y�E�z���_�v�ɂ́A�{�[���E�y���́u�L���b�v�v��i�莝���́j�u�A���~�~���v���g���Ă݂��B�i�}�R�j
�i�u�A���~�~���v�͓��a�T�C�Y�i6�o�Ӂj���傫�߂��āi10�o�Ӂj�A��͗ǂ��Ȃ������j
���A�u�����Y�v�̐ڒ��ɂ́u���O���d���ڒ��܁v���g�������A�������������ނ̏ꍇ�́A"�ʼn�����"��"�ʼn��x"�́A��ϗǍD���I
�|�|�|�|�|�|�|�|�|�|�|�|�|�|�|�|�|�|�|�|�|�|�|�|�|�|�|�|�|�|�|�|�|�|�|�|�|�|�|
Expanding camera experiment "08/06"

+++++ Are all pins connected ? +++++
I tried to attach a "connector" to FPC (Flexible Printed Circuits) whose connection end was broken so that I could connect and use it I've worked on it, but I'm still not sure about the "connection status." (Fig_2 <click>)
So, I decided to buy a "USB camera for cleaning the ear canal" (1.3 million pixels, \1,460 included shipping fee) and take a closer look at it from an angle that is difficult to see with a handheld magnifier.
However, this is also a near-focus type, but a clear image cannot be obtained until a few cm apart, so a sufficiently magnified image cannot be obtained.
Without stopping, I processed the convex lens in the "widening lens" for smartphones to make it a "near focus adapter" and looked at the enlarged image of the connection part. (Fig_1)
The image is not clear on the left, probably because of the "plastic lens".
There are terminals that do not seem to be connected, but they look different depending on the "viewing angle" and "how the light is applied," so I'm still not convinced.

+++++ Auxiliary lens for magnifying camera +++++
I try to buy internal viewing camera etc. to see the fine structure, but it doesn't seem to be what I expected.
The one I bought this time has a lot of pixels, so I thought it would be a little better.
However, the explanation emphasizes only "LED lighting", but it does not have the "focus adjustment function" that is really necessary.
This time, I attached an "auxiliary lens" to this to make it even more near focus.
This lens needs to have a small diameter in order to be as close as possible to the subject.
Fortunately (?) The lens I used is made of plastic, so it can be easily shaped by using "grinder". (Fig_4 <click>)
This time, it seems that I cut a little too much, but even this much is an obstacle when I want to see it from an angle.
For the "lens holder", I used a ball-point pen "cap" and "aluminum cylinder" I have. (Fig_3)
(The "aluminum cylinder" had a too large inner diameter 10 mm�� and is not fit to the nose of camera 6 mm��.)
I used "UV curable adhesive" to bond the "lens", so in the case of such transparent materials, the "setting time" and "setting degree" are very good !
�|�|�|�|�|�|�|�|�|�|�|�|�|�|�|�|�|�|�|�|�|�|�|�|�|�|�|�|�|�|�|�|�|
xD�J�[�h�A�_�v�^�@�����@�@[English Note]�@�@�@�u8��1���v
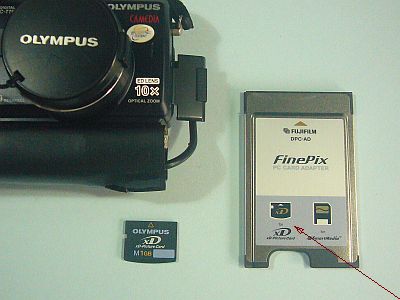
�{�{�{�@�uWin10�v�ł͔F�����Ȃ��H�@�{�{�{
���i�B�e�p�ɁA�uOLYMPUS C-770UZ�v��A�uC-750UZ�v����p���Ă���̂����A�i���������ƂɁj����̃��f�B�A��"xD�J�[�h"�Ȃ̂��B
�ʏ��"normal�Amini�A��SD�J�[�h"�Ȃ�A�L��]��قǗL���āA�ǂݏ����ɂ���قǍ��邱�Ƃ������̂����A"xD�J�[�h"�͑Ή��o����"USB�J�[�h�E���[�_�["���A�����ɂ�1�䂵�������B
�������A�P�[�u�����܂�Ȃ����Ȃ̂ŁA�����f�����Ă������Ȃ��^�C�v�Ȃ̂��B
�ŁA�\���i�Ƃ��āAxD�A�_�v�^�uFinePix DPC-AD�v���Ă݂��B�i�}�P�@���U�R�W�������݁j
�����A�����uWin10�v�i�ɐ�̂���Ă���H�j���C���@�ŁA�ʐ^��ǂ܂��悤�Ƃ������A"�A�_�v�^"�͔F��������̂́A���̉摜���ǂݏo���Ȃ��I�H
�����A�����]���Ȑݒ肩�A�Ή��h���C�o���K�v�Ȃ̂�������Ȃ����A�������ׂ����炢�ł͌��t�炸�B����"�A�_�v�^"�̖��O���܂������I�H�i�}�Q<�N���b�N>�j
�i�uWin10�v�́A�]�v�Ȃ����b�͈�t���Ă����̂ɁA��������������Ƃ����s�s���ɂ́A�S�����ڒ��炵���j
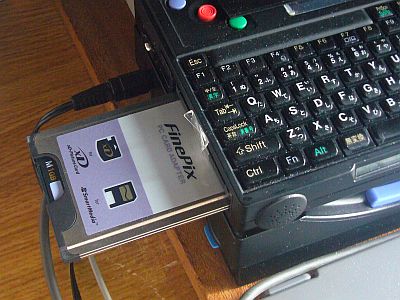
�{�{�{�@�uPC110�v�Ŏ�������I�@�{�{�{
����ł́I�ƁA���̊Ŏ��p�}�V���i�uWin7�v���ځj��������A����ɂ͐��K��"PC�J�[�h�X���b�g"�������B
�i���̑���ɁA�e��̃J�[�h�p���X���b�g�͂���̂����A����xD�p�͖����j
�v���]���āA�ӂƉ�������ƁA�uPC110�v������B�i�}�R�j
����ɂ́AIBM�J�[�h�E�T�[�r�X��h���C�o�������Ă���B�i����A���꒼�������肾�I�j
�����֍����Ă݂���A�f���ɔF���͂������A���g���ǂݏ����o���������B
�i�����A�摜�T�C�Y���傫�߂��āA�摜�\���\�t�g�ɖ�������Ă��܂����I�j
�ʂ̃��[�g�ŁA�摜��VGA�ɏk�����āA���߂ĕ\����������A�����Əo�ė�����i�}�S<�N���b�N>�j
�i�D�D�D�������A�uPC110�v�ł̊G�������Ȃ��D�D�D����́A�������u���p��v�̔z���ւ������Ȃ���D�D�D�j
���ʁA�uxD�A�_�v�^�v�͐���i�����A���C���@�iWin10�j�ł́A�g���Ȃ��炵���B
�܂��A�ʂ̂��̒T�����B
�|�|�|�|�|�|�|�|�|�|�|�|�|�|�|�|�|�|�|�|�|�|�|�|�|�|�|�|�|�|�|�|�|�|�|�|�|�|�|
Buy xD card adapter "08/01"

+++Do you not recognize with "Win10"? ++++
"OLYMPUS C-770UZ" and "C-750UZ" are used regularly for landscape photography. But (problematically) the media for this is the "xD card".
There are so many normal card adaptor such as "normal, mini, ��SD cards", and I don't have much trouble reading and writing.
But there is only one "USB card reader" that can handle "xD cards".
Moreover, since the cable is foldable, it is a type that does not make I laugh even if it breaks.
So I bought the xD adapter "FinePix DPC-AD" as a spare part. (Fig_1 \638 including shipping)
Immediately after I got it, I tried to make the main machine read "Win10" (Is it occupied by?) Cannot read the image of ?
Maybe it needs some extra configuration or a corresponding driver, but I can't find it after a little research. There is no name for this "adapter" yet! ? (Fig_2 <click>)
("Win10" takes care of all the extra care, but it seems that such a little inconvenience is completely careless.)

+++++ Try it with "PC110"! +++++
And when I look a sub machine (equipped with "Win7"), there is no normal "PC card slot".
(Instead, although there are small slots for various cards, there is no xD at all.)
When I looked at the side desk, I found "PC110". (Fig_3)
It contains IBM Card Services and drivers. (I just re-inserted it the other day !)
When I went to that place, I recognized it honestly and could read and write the contents.
(However, the image size was too large and was ignored by the image display software!)
By another route, I reduced the image to VGA and displayed it again, it came out properly (Fig_4 <click>)
(... However, the picture with "PC110" is dirty... I have to change the wiring of the "relay board" sometime. ...)
As a result, this "xD adapter" is not abnormal, but it seems that it cannot be used on the main machine (Win10).
Let's find another one.


